Application Control
The Application Control module adds another layer of protection against a wide range of malware threats (ransomware, zero-day attacks, exploits on third party applications, Trojans, spyware, rootkits, adware and so on) by blocking unauthorized applications and processes from running through its content scanning capabilities.
Note
Availability and functioning of this feature may differ depending on the license included in your current plan.
Application Control reduces the attack surface that malware threats can leverage on the endpoint and prevents the installation and execution of any unwanted, untrusted or malicious applications.
Note
This module is available for:
Windows for workstations
Windows for servers
Application Control enforces flexible policies that allow you to whitelist applications and manage the update permissions.
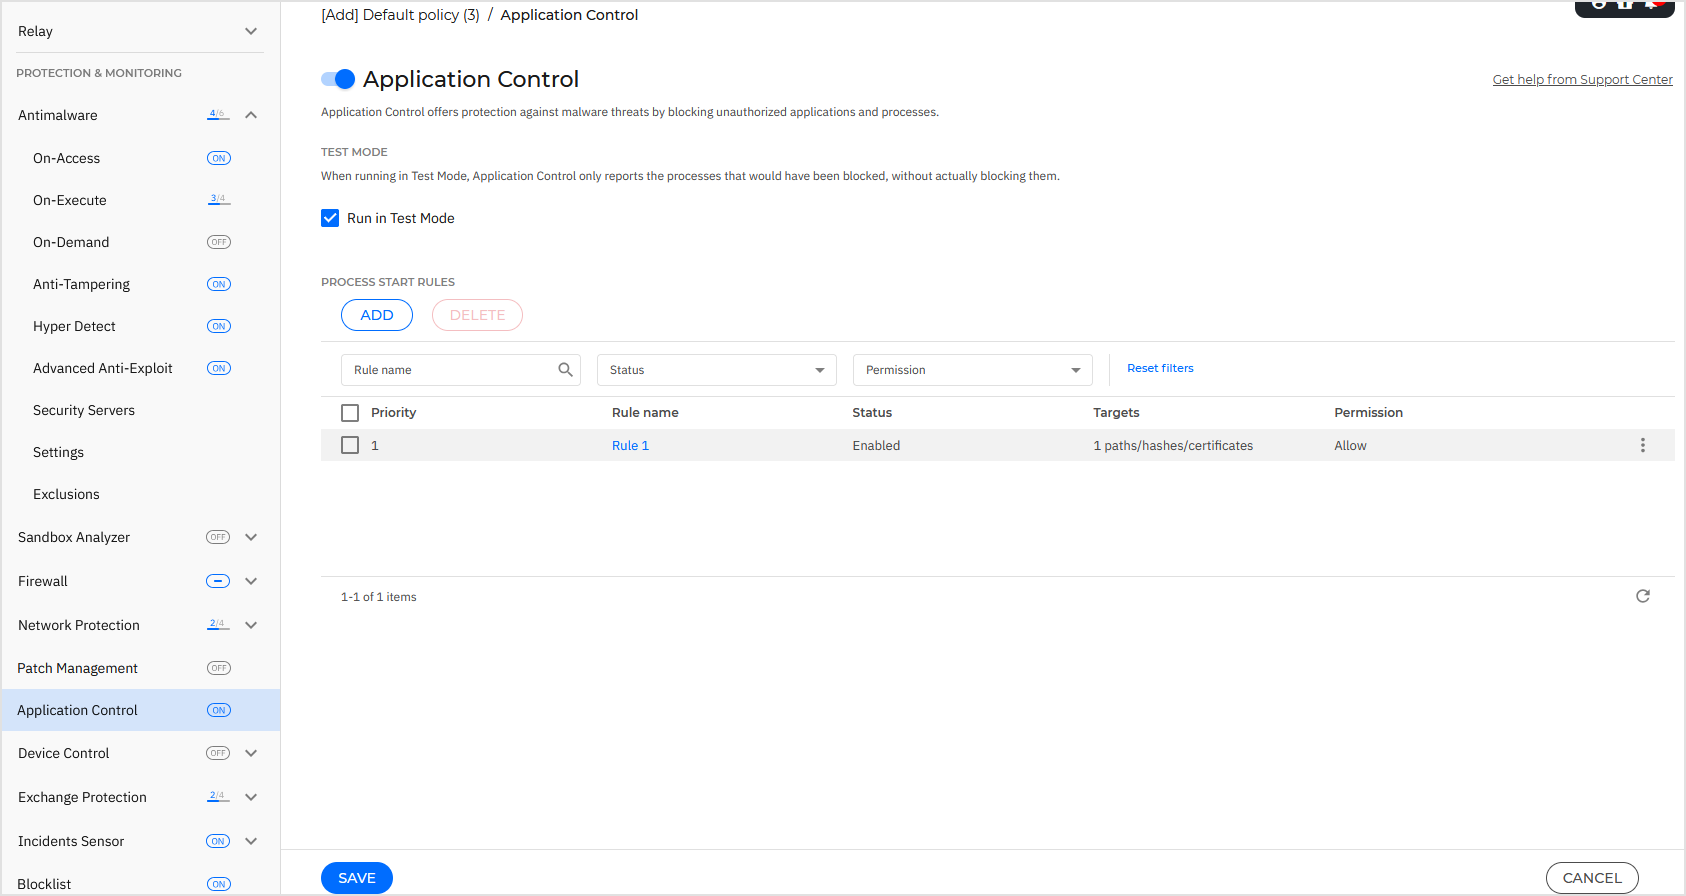
To use Application Control, click the toggle to enable the module.
Important
Application Control highly affects Power User mode after application updates. For example, when a whitelisted application is updated, the endpoint submits the new information. GravityZone updates the rule with the new values and resends the policy.
You must run the Applications Discovery task to view the running applications and processes in your network. When the Application Control module is activated for the first time on an endpoint, the application discovery process will start in the background. Any future changes made in the policy for this module will not trigger the discovery process again. For more information, refer to Applications Discovery. Then, you can define Application Control rules.
Please note that activating Application Control will generate a certain amount of traffic on endpoints:
No data is transmitted to GravityZone if Application Control is active but not configured to block applications on the endpoint.
If Application Control is active and configured to block applications on the endpoint, information about the blocking events will be sent to GravityZone every minute.
The amount of data transmitted will be proportional to the number of applications discovered. For a definite traffic estimate, please use the Run in Test Mode option on a couple of endpoints, to calculate the amount of data transmitted based on the existing rules and user behavior.
Application Control runs in two modes:
Test Mode. Application Control only detects and reports the applications in Control Center, leaving them to run as usual. You can configure and test your whitelisting rules and policies, but applications will not be blocked.
Warning
Enabling the Application Control functionality in Test Mode on all endpoints creates an increased risk of Gravity Zone Virtual Appliance functionality disruption, as a high number of events might be generated by the respective endpoints in a short amount of time.
This way the database size will gradually increase, and will eventually deplete any available disk space.
Production Mode. Application Control blocks all unknown applications. Microsoft operating system processes and Bitdefender processes are whitelisted by default. Defined whitelisted applications will be allowed to run. To update whitelisted applications, you must define updaters. These are specific processes that are allowed to change existing applications. For more information, refer to Application Inventory.
Warning
To make sure legitimate applications are not restricted by Application Control, you must run Application Control in test mode first. This way you can make sure that the whitelisting rules and policies are properly defined.
Processes that are already running when the Application Control is set to Production Mode will be blocked after the next process restart.
To manage applications' permission to run:
Click the toggle to enable the Application Control module.
Click the Run in Test Mode checkbox to enable or disable test mode.
Note
In test mode, you are notified if Application Control would have blocked a specific application. For more information, refer to Notifications.
Blocked Application notifications will be displayed in the Notification Area when new applications are detected and when blacklisted applications are blocked.
Define process start rules.
Process start rules
Application Control allows you to manually authorize specific applications and processes, based on the hash of the executable, signing certificate thumbprint, and path of the application. You can also define rule exclusions.
Note
To obtain the custom values for the hash of the executable and thumbprint of the certificate, use Application Control tools.
The Process Start Rules table informs you of the existing rules, providing important information:
Rule priority. The rule with higher priority is closer to the top of the list.
Rule name and status.
Target applications and their permission to run. The target represents the number of conditions that must be matched in order for the rule to apply, or the number of applications or groups to which the rule applies.
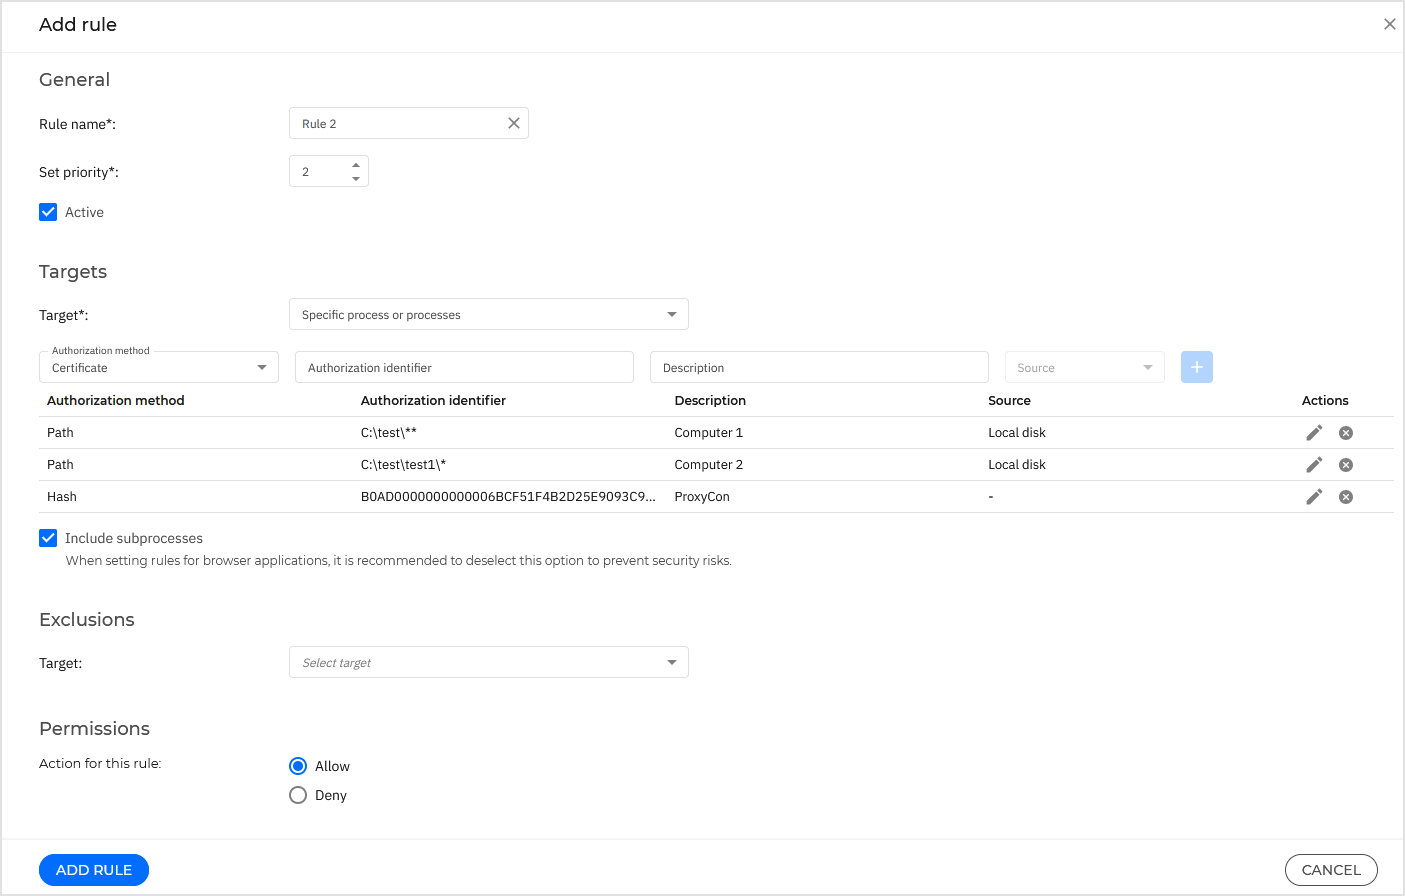
To create a process start rule:
Click the Add button at the upper side of the table to open the configuration window.
In the General section, enter a Rule name.
Select the Active checkbox to activate the rule.
In the Targets section, specify the rule destination:
Specific process or processes, to define a process that is allowed or denied from starting. You can authorize by path, hash or certificate. The conditions inside the rule are matched by logical AND.
To authorize an application from a specific path:
Select Path under Authorization method
Specify the path to the object under Authorization identifier. You can provide an absolute or relative pathname and use wildcard characters. The asterisk symbol (*) matches any file within a directory. A double asterisk (**) matches all files and directories in the defined directory. A question mark (?) matches exactly one character. \
You can also add a description to help identify the process.
From the Source drop-down list, select Local disk, CD-ROM, Removable drive or Network share and click Apply. You can block an application executed from a removable device, or allow it if the application is locally executed.
Click the
 Add button to add the application.
To authorize an application based on hash:
Select Hash in the Authorization method field and
Enter a hash value under Authorization identifier.
You can also add a description to help identify the process.
Click the
Add button to add the rule.
Important
To generate the hash value, download the Fingerprint tool. For more information, refer to Application Control tools
Hash value must have 80 characters.
To authorize based on a certificate, and
Select Certificate under Authorization method.
Enter a certificate thumbprint under Authorization identifier.
You can also add a description to help identify the process.
Click the
Add button to add the rule.
Important
To obtain the certificate thumbprint, download the Thumbprint tool. For more information, refer to Application Control tools
Hash value must have 64 characters.
Inventory applications or groups, to add a group or an application discovered in your network. You can view the applications running in your network on the Network > Application Inventory page. For more information, refer to Application Inventory.
Start typing and select the corresponding checkboxes to add applications and group names. The auto-fill function displays suggestions as you type.

To change the list of suggestions or to make the existing list disappear, type other characters or delete them from the field.
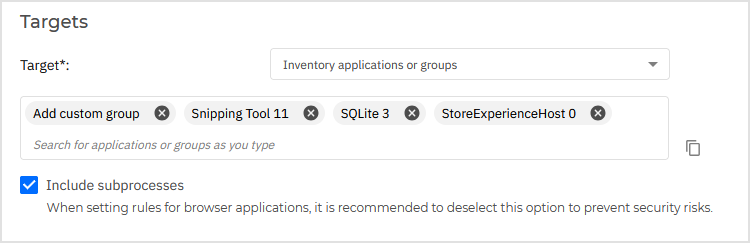
To delete entries, deselect them in the list of suggestions or click the X button for each one.
Select the Include subprocesses checkbox to apply the rule to spawned child processes.
Warning
When setting rules for browser applications, it is recommended to turn off this option to prevent security risks.
Optionally, you can also define exclusions from the process start rule. The adding operation is similar to the one described in the previous steps.
In the Permissions section, choose whether to allow or deny the rule to run.
Click Add rule to create the rule.
To edit an existing rule:
Click the rule name to open the configuration window.
Enter the new values for the options you want to modify.
Click Save to apply the changes.
To set the rule priority:
In the table, go to the desired rule.
Click to open the
 More menu.
Click the Edit priority option.
Use the arrows or type in a different number in the Priority column.
Confirm the changes.
Alternately, use the Move to top option in the More menu to assign priority 1 to a rule.
You can delete one or several rules at once. Once a rule is deleted, you cannot recover it.
To delete a single rule:
In the table, go to the desired rule.
Click to open the
More menu.Click the Delete option.
To delete several rules at once:
In the table, select the rules you want to delete.
Click the Delete button at the upper side of the table.