Update GravityZone
GravityZone includes an Update Server role, designed to serve as the centralized update distribution point for your GravityZone deployment. Update Server checks for and downloads all available GravityZone updates from the Bitdefender update servers on the Internet, making them available in the local network. The GravityZone components can be configured to automatically update from the local update server instead of the Internet.
When a new update is available, the GravityZone appliance, the security agent or the Security Server checks the digital signature of the update for authenticity, and the contents of the package for integrity.
Next, each update file is parsed and its version is checked against the installed one. Newer files are downloaded locally and checked against their SHA256 hash to make sure they are not altered.
If at any moment a check is not passed, the update process stops, returning an error. Otherwise, the update is considered valid and ready to be installed.
Updating GravityZone appliances
Through GravityZone appliance updates, Bitdefender releases new features and improvements of existing ones. These are visible in Control Center.
Before running an update, it is recommended you check the following:
The update status
Any information or warning messages that may appear.
The changelog
To check the update status:
Log in to GravityZone Control Center.
Go to the Configuration > Update > GravityZone Roles page.
Under the Current Status section, glance over the message that points the general status of your deployment. If GravityZone needs updating, the Update button becomes available.
Under the Infrastructure section, inspect the details for each GravityZone role deployed in your network. Because roles update independently, for each role you can view: the name of the appliance hosting it, its IP address, current version, the latest version available, and update status.
To check the changelog:
Log in to GravityZone Control Center.
Go to the Configuration > Update > GravityZone Roles page.
Click the View changelog link. A pop-up window displays a list with all versions and changes they included.
Release Notes for each new product version are also available here.
You can update GravityZone in two ways:
Manually
Automatically
Manual update
Choose this method if you want to have full control of when the update should roll out.
To manually update GravityZone:
Log in to GravityZone Control Center.
Go to the Configuration > Update > GravityZone Roles page.
Click the Update button (if available).
The update may take a while. Please wait until it is complete.
Clear the browser cache.
During the update, Control Center logs out all users and informs them of an in-progress update. You will be able to view a detailed progress of the update process.
When the update is complete, Control Center displays the Login page.
Automatic update
By installing updates automatically, you are sure that GravityZone is always updated with the latest features and security patches.
GravityZone has two types of automatic updates:
Product updates
Third party software updates
These updates bring new features in GravityZone and resolve issues resulted from these features.
Because updates are disruptive for GravityZone users, they are designed to run based on a schedule. You can schedule the update to take place at convenient hours. By default, automatic product updates are disabled.
To enable and schedule product updates:
Log in to GravityZone Control Center.
Go to Configuration > Update > GravityZone Roles page.
Select the Enable automatic GravityZone product updates check box.
Set the Recurrence to Daily, Weekly (select one or more weekdays) or Monthly.
Define an Interval. You can schedule a time for the update process to begin when a new update is available.
GravityZone displays by default a warning message to all Control Center users 30 minutes before the automatic update starts. To disable the warning, clear the check box Enable the 30 minutes downtime alert before update.
GravityZone virtual appliance embeds a series of software products provided by other vendors. This type of update aims to patch such software as soon as possible, diminishing possible security risks.
These updates run silently and do not interrupt the work with Control Center.
By default, this option is enabled. To disable this option:
Log in to GravityZone Control Center.
Go to the Configuration > Update > GravityZone Roles page.
Clear the check box Enable automatic security updates for 3rd party GravityZone components.
Third party software patches will then be released once with the GravityZone product update.
Configuring the Update Server
By default, the Update Server downloads updates from the Internet every hour. It is recommended not to change the default Update Server settings.
To check and configure the Update Server settings:
Log in to GravityZone Control Center.
Go to the Update page in Control Center and click the Components tab.
Click the Settings button at the upper side of the pane on the left side to display the Update Server Settings window.
Under Update Server Configuration, you can check and configure the main settings.
Packages Address
The address where packages are downloaded from.
Update Address
Update Server is configured to check for and download updates from
upgrade.bitdefender.com:80.This is a generic address that is automatically resolved to the closest server that stores Bitdefender updates in your region.
Port
When configuring the various GravityZone components to update from Update Server, you must provide this port.
The default port is
7074.IP
The IP address of the Update Server.
Update period (hours)
If you want to change the update period, type a new value in this field. The default value is 1.
You can configure the Update Server to automatically download the endpoint kits.
Update Server can act as gateway for data sent by the Bitdefender client products installed in the network to the Bitdefender servers. This data may include anonymous reports regarding virus activity, product crash reports and data used for online registration. Enabling the gateway roles is useful for traffic control and in networks with no Internet access.
Note
You can disable the product modules that send statistical or crash data to Bitdefender Labs anytime you want. You can use policies to remotely control these options on the computers and virtual machines managed by Control Center.
Click Save.
Downloading product updates
You can view information about the existing GravityZone component packages under the Components tab.
Available information includes the current version, update version (if any), and the status of update operations you initiate.
To update a GravityZone component:
Log in to GravityZone Control Center.
Go to the Update page in Control Center and click the Components tab.
Click the component you want to update in the Product list. All available versions will be displayed in the Packages table. Select the check box corresponding to the version you want to download.
Note
New packages will be in the Not downloaded state. Once a newer version is released by Bitdefender, the oldest undownloaded version will be removed from the table.
Click Actions at the upper side of the table and select Publish. The selected version will be downloaded and the status will change accordingly. Refresh the table contents by clicking the Refresh button and check the corresponding status.
Staging updates
Staging enables you to test newer kits or product updates in an enclosed and controlled environment before publishing them in your network. The staging environment should mirror production as closely as possible for the purposes of testing. By doing this, you can maximize your chances of finding any issues that may appear in your environment, before releasing the version in production.
The staging feature also allows you to create a policy for the critical endpoints from production. You can update these endpoints only after the updates have been tested in the staging environment and on the non-critical machines from production. For more details, refer to Publishing with Update Rings.
Note
Staging is disabled by default.
Security Server (VMware with NSX) does not support staging.
The product and security content are initially released on Fast ring. If the feedback is positive, after a week, the same version is deployed on Slow ring. For emergency fixes, you can expect the Slow ring update within 24 hours from the Fast ring release.
In the unlikely event that an issue occurs on the Fast ring, it will be fixed before the Slow ring update. For critical issues, Slow Ring releases can be delayed or stopped entirely until a new version with the resolved issues is released, restarting the whole release cycle.
Bitdefender Endpoint Security Tools offers downgrade protection when switching between rings. For the product, when you switch from a newer version from Fast ring to Slow ring, it will not downgrade the product to the Slow ring version. For security content, it is reverted to the one currently available in the market.
Product update phases:
Fast Ring. The endpoints with a Fast ring policy will receive the newest available updates. This setting is recommended for the non-critical endpoints in production.
Slow Ring. The endpoints with a Slow ring policy will receive updates at a later date, depending on the response received from the Fast ring endpoints. It is a precautionary measure in the update process. This is the default setting.
Best practices
You can use the update rings in the following situations:
Temporary, for a specific update to patch a critical issue on an endpoint. In this case:
Switch from Slow ring to Fast ring.
Apply the update.
Switch back to Slow ring.
Permanently, to test the update and to ensure compatibility with custom, internal software. You can set some endpoints to Fast Ring for early adoption and feedback, while the other ones from the organization remain on Slow Ring. In this case:
Switch from Slow ring to Fast ring.
Apply the update.
To switch between rings, you have two options:
Edit the existing policy for the target endpoints:
Log in to GravityZone Control Center.
Go to the Policies page from the left side menu.
Select your policy.
Go to General > Update.
On the Update ring tab, select either Fast ring or Slow ring.
Click Save.
Create a new policy. After the policy is created, you can change the update ring by editing the policy at any time.
For more information, refer to Creating policies.
Note
When you switch the ring from Fast before a Slow ring update, you receive a notification during the next update that the installed version is newer than the one available on the Update Server. The product updates as soon as a newer version is available for the Slow ring.
Prerequisites
Staging mode requires the GravityZone infrastructure to meet the following conditions:
The Update Server must be installed alone on the virtual appliance.
If you have the Update Server together with other roles on the appliance, you must follow these steps:
Delete the old Update Server role.
Deploy a new GravityZone appliance.
Important
Do not install any roles yet.
Connect the new appliance to the existing GravityZone database.
Install the Update Server role on the new appliance.
For more information on installing GravityZone roles, refer to Manage the GravityZone appliance.
The Update Server appliance must be of at least 120 GB.
The Web Console appliance must be of at least 120 GB.
Using staging
To set up the staging environment and test the latest updates you must:
To enable staging mode for GravityZone updates:
Log in to GravityZone Control Center.
Go to the Configuration > Update page and click the Components tab.
Click the Settings button at the upper side of the pane on the left side to display the Update Server Settings window.
Select the Enable Staging check box.
Under Production Server Configuration, configure the main settings:
Packages Address
The address where packages are downloaded from:
download.bitdefender.com/SMB/Hydra/releaseUpdate Address
The address where product updates are downloaded from:
upgrade.bitdefender.com:80.Port
The default port is
7074. You cannot edit this field.IP
The IP address of the Update Server. You cannot edit this field.
Update period (hours)
If you want to change the update period, type a new value in this field. The default value is 1.
The production and update server can act as gateways for data sent by the Bitdefender client products installed in the network to the Bitdefender servers. This data may include anonymous reports regarding virus activity, product crash reports and data used for online registration. Enabling the gateway roles is useful for traffic control and in networks with no Internet access.
Note
You can disable the product modules that send statistical or crash data to Bitdefender Labs anytime you want. You can use policies to remotely control these options on the computers and virtual machines managed by Control Center.
Under Staging Server Configuration, configure the following options:
Port
The default port is
7077.IP
The IP address of the Update Server. You cannot edit this field.
Under Packages, you can configure Update Server to automatically download and publish endpoint kits.
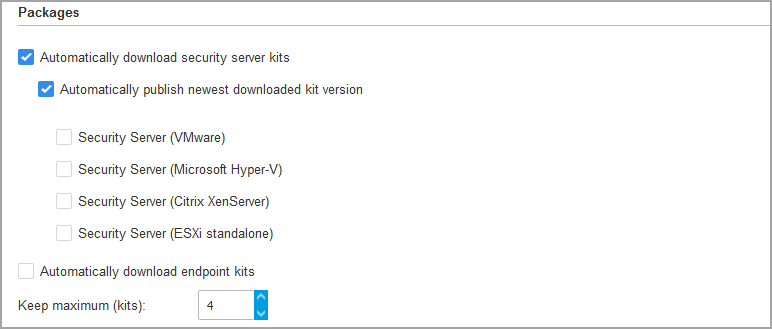
You can also configure the maximum number of kits that you can store on the GravityZone appliance. Enter a number between 4 and 10 in the Keep maximum (kits) menu.
Under Products Update, you can configure Update Server to automatically download updates for security agents.
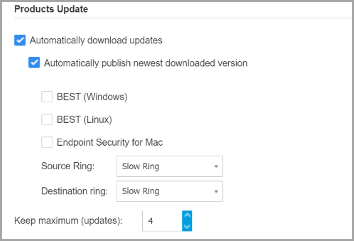
You can choose to also automatically publish newest downloaded versions:
Select at least one security agent from the available list.
Define the source and destination rings:
Source ring. The ring used to send the updates in the staging environment. When a version is validated by its early adopters it will be published on the slow ring. This is the default value. The newest available updates will be published on the fast ring.
Destination ring. The ring used to publish the updates in production. You can select between fast and slow.
You can also configure the maximum number of updates that you can store on the GravityZone appliance. Enter a number between 4 and 10 in the Keep maximum (updates) menu.
Click Save.
Once enabled staging, build your staging environment to start testing the available product kits and updates.
Important
Disabling staging will delete all unpublished packages and product updates.
You need to define a staging policy:
Log in to GravityZone Control Center.
Go to the Policies page from the left side menu.
Select or create a policy to use in the test environment.
Under the General > Update section, enter the Staging Server address in the Update Locations table.
Configure the other policy settings as needed. For more details, refer to Configuring policies.
Click Save.
To install the latest package on the testing endpoints:
Log in to GravityZone Control Center.
Go to the Configuration > Update page and select the Components tab.
Click Check for updates to make sure you view the latest released product version.
Click the component you want to update in the Product list.
Select a package available in the Packages table, which you want to test. You can download several kits for every product, up to the limit specified in the Update Server Settings window. When this limit is reached, the oldest version is removed from the table.
Click Actions and select Download to get the package to your GravityZone appliance.
Having the package selected, click Save to disk. The package configuration window is displayed.
Configure the package. For more information, refer to Creating Installation Packages.
Install the kit on the testing endpoints.
Monitor the behavior of the endpoints.
If the package has installed successfully and the endpoints have normal behavior, you can publish the package to the production network.
To publish a package, select it in the Packages table, click Actions at the upper side of the table and select Publish.
Important
You cannot publish packages older than the one already published.
If you encounter problems with the package, you can log a support ticket. For more details, refer to Getting Help.
To delete a package from the GravityZone appliance, click the Actions button and choose Delete from disk.
To assign the staging policy to the testing endpoints:
Log in to GravityZone Control Center.
Go to the Network page from the left side menu.
Choose Computers and Virtual Machines from the views selector.
Select the group that you want from the left-side pane. All computers from the selected group are displayed in the right-side pane table.
Select the check box of the computer or group that you want. You can select one or several objects of the same type only from the same level.
Click the
 Assign Policy button at the upper side of the table.
Make the necessary settings in the Policy assignment window. For more information, refer to Assigning policies.
To install the latest updates:
Log in to GravityZone Control Center.
Go to the Configuration > Update page from the left side menu and select the Components tab.
Click Check for updates to make sure you view the latest released product update.
Select the Bitdefender product of your choice in the Product list.
Note
You can use staging only with updates for security agents and not for Security Servers.
Select an update available in the Updates table, which you want to test.
Click Actions and select Download to get the update to your GravityZone appliance.
You can download several updates for every product, up to the limit specified in the Update Server Settings window. When this limit is reached, the oldest version is removed from the table.
Having an update selected, click Actions and select Add to staging. The update will install on the testing endpoints, according to the policy settings. For more details refer to Defining the Staging Policy.
If the update has installed successfully and the endpoints have normal behavior, start to send out the update to the machines in production. First, update the non-critical machines to run another test before updating the critical endpoints. For more details, refer to Publishing with Update Rings.
If you encounter problems with the update, you can log a support ticket. For more details, refer to Getting Help.
To delete an unpublished update from the GravityZone appliance, click the Actions button and choose Delete. You can delete only unpublished updates.
To test the update on the non-critical endpoints from production, you must first edit the existing policies and assign them a fast ring policy.
Note
A slow ring policy is automatically assigned for all the policies you create.
Log in to GravityZone Control Center.
Go to the Policies page from the left side menu.
Edit the policy setting for the non-critical endpoints in production. In the Update Ring section select Fast ring.
Note
The update published on fast ring cannot be older than the one published on the slow ring.
Publish the update on the fast ring:
Go to the Configuration > Update page from the left side menu and select the Components tab.
Select the update in the Updates table, click the Actions button at the upper side of the table and choose Publish.
Select the fast ring option.
Note
When you first publish an update, it will be available on the fast and slow rings.
At this point, all endpoints with fast ring policy are being updated to the published version.
Monitor the behavior of the fast ring endpoints.
If the update has installed successfully and the endpoints have normal behavior, you can publish the update on the slow ring:
Go to the Configuration > Update page from the left side menu and select the Components tab.
Select the update in the Updates table, click the Actions button at the upper side of the table and choose Publish.
Select the slow ring option.
Every endpoint from production is now updated to the version you published.
If you encounter problems with the package, you can log a support ticket. For more details, refer to technical support.
For information about how to update GravityZone offline environments, refer to Update GravityZone products offline.