Deploy and set up GravityZone VA
A GravityZone deployment consists of one or several virtual appliances running the server roles. The number of appliances depends on various criteria, such as the size and design of your network infrastructure, or the GravityZone features you will use. Server roles are of three types: basic, auxiliary, and optional.
Important
Auxiliary and optional roles are available only to certain GravityZone solutions.
GravityZone Role | Role Type | Deployment |
|---|---|---|
Database Server Update Server Web Console Endpoint Communication Server Endpoint Events Processing Server | Basic (Required) | At least one instance of each role. A GravityZone appliance can run one, several, or all of these roles. Endpoint Communication Server and Endpoints Events Processing Server roles must be installed together on the same virtual appliance. |
Report Builder Database Report Builder Processors Incidents Sensor | Auxiliary | One appliance for each role |
Security Server | Optional | Recommended only in small networks or if low on resources. Otherwise, deploy a stand-alone Security Server from Control Center, after GravityZone deployment is complete. |
Note
To receive incidents from the EDR sensor module or prevention modules such as Antimalware, Advanced Threat Control, Hyper Detect, or Antiexploit, you need to have the Incidents server role installed.
Depending on how you distribute the GravityZone roles, you will deploy one or more GravityZone appliances (at least three appliances if you use Report Builder). The Database Server is the first to be installed.
Note
Report Builder is only available with certain GravityZone products.
In a scenario with multiple GravityZone appliances, you will install the Database Server role on the first appliance and configure all other appliances to connect to the existing database instance.
You can deploy more instances of Database Server, Web Console, and Endpoint Communication Server roles. In this case, you will use Replica Set for Database Server, and load balancers for Web Console and Endpoint Communication Server roles on the GravityZone appliances.
It is recommended to install the Report Builder roles after you set up GravityZone, meaning: installing the basic GravityZone roles, configuring Control Center, updating GravityZone, and deploying protection on endpoints. Also, you need to first install Report Builder Database, followed by Report Builder Processors.
To deploy and set up GravityZone:
Download the GravityZone virtual appliance image from the Bitdefender website (link provided in registration or purchase email).
Import the GravityZone virtual appliance image in your virtualized environment.
Power on the appliance.
From your virtualization management tool, access the console interface of the GravityZone appliance.
Configure the password for
bdadmin, the built-in system administrator.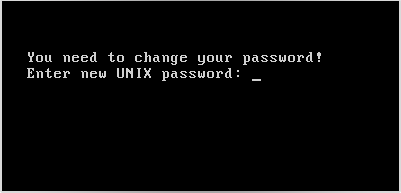
Log in with the password you have just set.
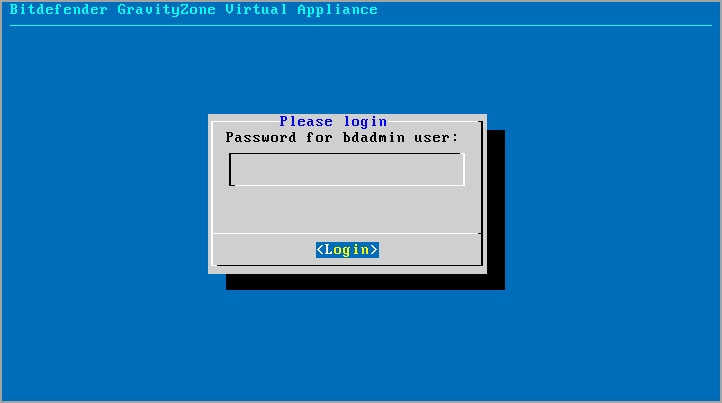
You will access the appliance configuration interface.
Use the arrow keys and the
Tabkey to navigate through menus and options. PressEnterto select a specific option.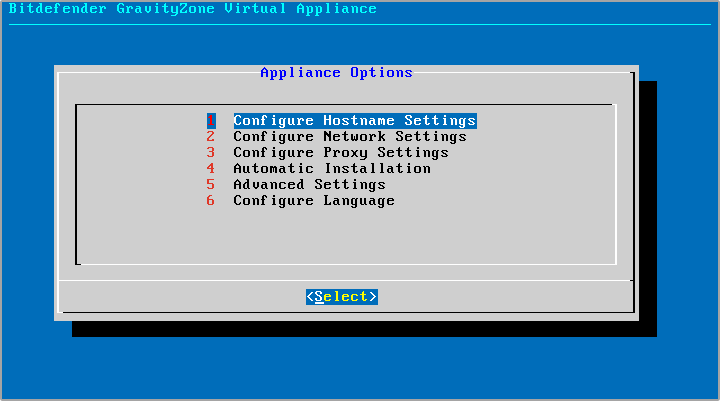
If you need to change the interface language, select the option Configure Language. For configuration details, refer to Configure Language.
Configure the proxy settings (if needed).
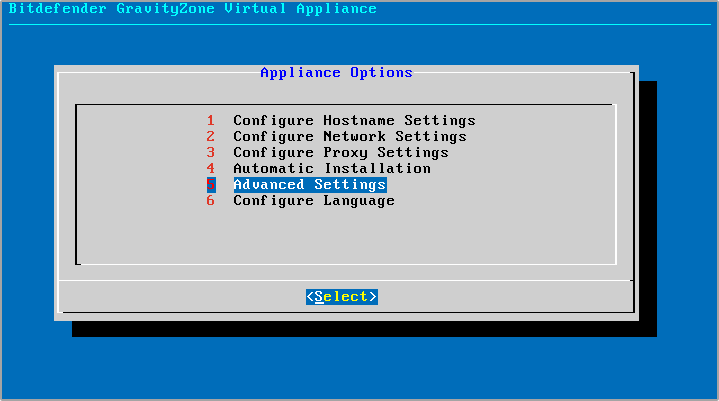
Install the GravityZone server roles. You have two options:
Automatic Installation. Select this option if you need to deploy only one GravityZone appliance in your network.
Advanced Settings. Select this option if you need to deploy GravityZone manually or in a distributed architecture.
After deploying and setting up the GravityZone appliance, you can anytime edit the appliance settings using the configuration interface. For more information regarding the GravityZone appliance configuration, refer to Managing the GravityZone Appliance.
Configure hostname settings
Communication with the GravityZone roles is performed using the IP address or DNS name of the appliance they are installed on. By default, the GravityZone components communicate using IP addresses. If you want to enable communication via DNS names, you must configure GravityZone appliances with a DNS name and make sure it correctly resolves to the configured IP address of the appliance.
Prerequisites:
Configure the DNS record in the DNS server.
The DNS name must correctly resolve to the configured IP address of the appliance. Therefore, you must make sure the appliance is configured with the correct IP address.
To configure the hostname settings:
From the main menu, select Configure Hostname Settings.
Enter the hostname of the appliance and the Active Directory domain name (if needed).
Select OK to save the changes.
Configure network settings
You can configure the appliance to automatically obtain network settings from the DHCP server or you can manually configure network settings. If you choose to use DHCP, you must configure the DHCP Server to reserve a specific IP address for the appliance.
From the main menu, select Configure Network Settings.
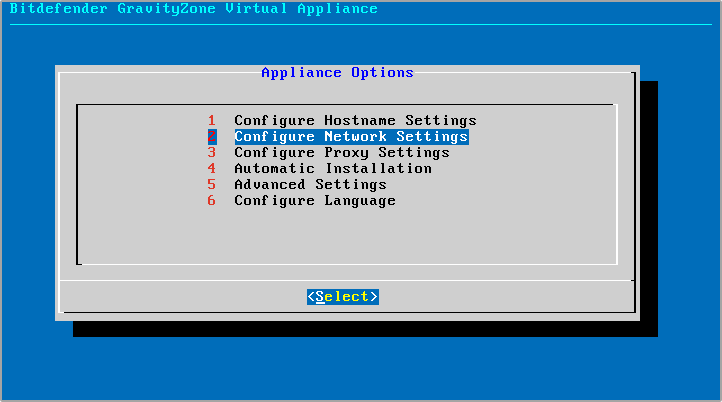
Select the network interface.
Select the configuration method:
Configure network settings manually
You must specify the IP address, network mask, gateway address, and DNS server addresses.
Obtain network settings automatically via DHCP
Use this option only if you have configured the DHCP Server to reserve a specific IP address for the appliance.
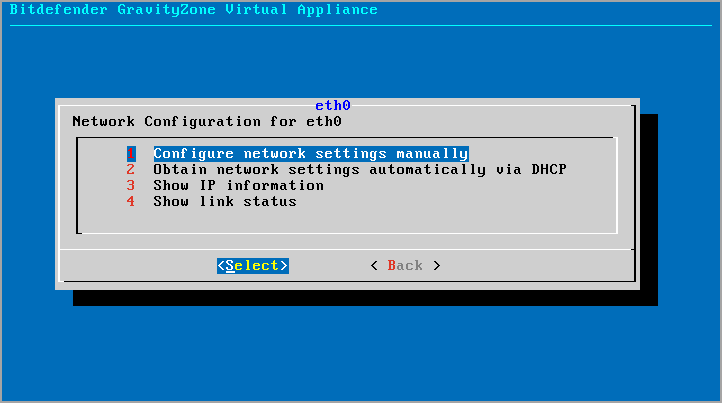
You can check current IP configuration details or link status by selecting the corresponding options.
Configure proxy settings
If you want the appliance to connect to the Internet through a proxy server, you must configure the proxy settings.
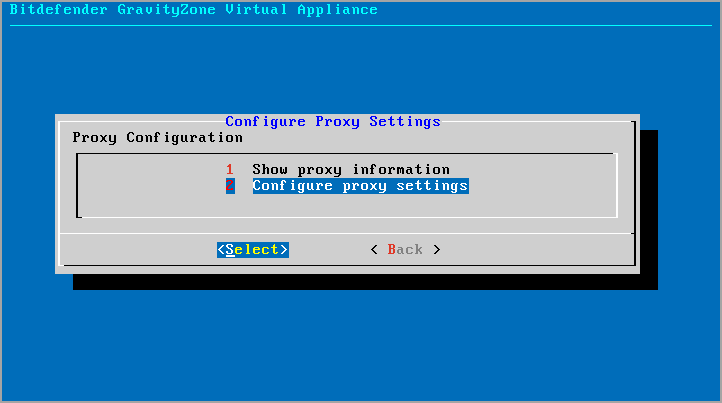
From the main menu, select Configure Proxy Settings.
Select Show proxy information to check if the proxy is enabled.
Select OK to return to the previous screen.
Select again Configure proxy settings.
Enter the proxy server address.
Use the following syntax:
If the proxy server does not require authentication:
http(s)://<IP/hostname>:<port>If the proxy server requires authentication:
http(s)://<username>:<password>@<IP/hostname>:<port>
Select OK to save the changes.
Automatic installation
During automatic installation, all basic roles are installed on the same appliance. For a distributed GravityZone deployment, refer to Advanced settings.
Important
Automatic deployment will also install the Security Server, embedded into the GravityZone appliance. For information about Security Server, refer to GravityZone Architecture.
If your license type restricts its use, you can remove this role afterwards.
The option to install roles automatically is available only at the initial setup of GravityZone.
To install the roles automatically:
From the main menu, select Automatic Installation.
Read and accept the End User License Agreement (EULA) to continue.
Confirm the roles to be installed.
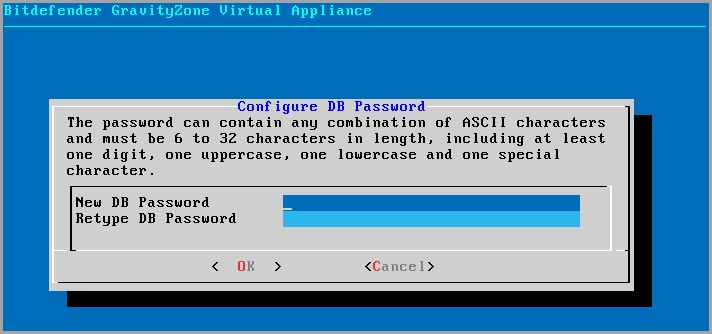
Set the password for the Database Server.
The password can contain any combination of ASCII characters and must be 6 to 32 characters in length, including at least one digit, one uppercase, one lowercase and one special character.
Wait until installation process is complete.
Advanced settings
Use this option to install only a part or all of the GravityZone roles, individually, or to extend your GravityZone infrastructure. You can install the roles on one or more appliances. This installation method is required when staging updates or in distributed GravityZone architectures to scale GravityZone in large networks and to ensure high availability of the GravityZone services.
To install the roles individually:
From the main menu, select Advanced Settings.
Select Install/Uninstall Roles to install the appliance in a GravityZone environment with a single database server.
Note
The other options are for extending the GravityZone deployment to a distributed architecture. For more information, refer to Connect to Existing Database or to Connect to Existing Database (Secure VPN Cluster).
Select Add or remove roles. A confirmation message will appear.
Press
Enterto continue.Press the
Spacebar and then theEnterkey to install the Database Server role. You must confirm your choice by pressingEnteragain.Set the database password.
The password can contain any combination of ASCII characters and must be 6 to 32 characters in length, including at least one digit, one uppercase, one lowercase, and one special character.
Press
Enterand wait for the installation to complete.Install the other roles by choosing Add or remove roles from the Install/Uninstall Roles menu and then the roles to install.
Choose Add or remove roles from the Install/Uninstall Roles menu.
Read the End User License Agreement. Press
Enterto accept and continue.Note
This is required only once after installing the Database Server.
Select the roles to install. Press the
Spacebar to select a role andEnterto proceed.Press
Enterto confirm and then wait for the installation to complete.
Note
Each role is normally installed within a few minutes.
During installation, required files are downloaded from the Internet. Consequently, the installation takes more time if the Internet connection is slow.
If the installation hangs, redeploy the appliance.
To ensure the appliance is working correctly, it is recommended to reboot it every 70 days.
Configure language
Initially, the appliance configuration interface is in English.
To change the interface language:
Select Configure Language from the main menu.
Select the language from the available options. A confirmation message will appear.
Note
You may need to scroll down to view your language.
Select OK to save the changes.