Assigning local policies
You can assign local policies in two ways:
Device-based assignment, meaning that you manually select the target endpoints to which you assign the policies. These policies are also known as device policies.
Rule-based assignment, meaning that a policy is assigned to a managed endpoint if the network settings on the endpoint match the given conditions of an existing assignment rule.
Note
You can assign only policies created by you. To assign a policy created by another user, you have to clone it first in the Policies page.
Assigning device policies
In GravityZone, you can assign policies in multiple ways:
Assign the policy directly to the target.
Assign the policy of the parent group through inheritance.
Force policy inheritance to the target.
By default, each endpoint or group of endpoints inherits the policy of the parent group. If you change the policy of the parent group, all descendants will be affected, excepting those with an enforced policy.
To assign a device policy:
Log in to GravityZone Control Center.
Go to the Network page from the left side menu.
Choose the network view from the views selector.
Select the target endpoints. You can select one or several endpoints or groups of endpoints.
For inheritance purposes, you cannot change the policy of the root group from default. For example, Computer and Virtual Machines will always have the Default policy assigned.
Click the
 Assign Policy button at the upper side of the table, or select the Assign Policy option from the contextual menu.
The Policy Assignment page is displayed:
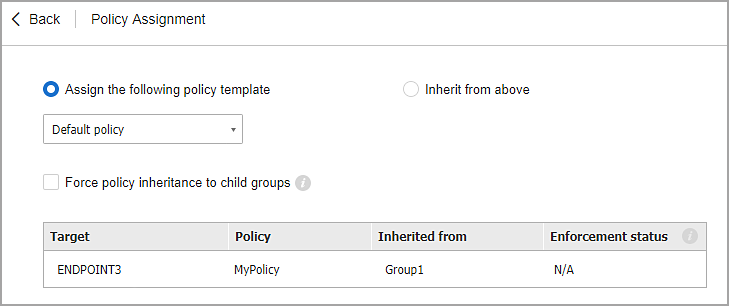
Check the table with target endpoints. For each endpoint, you can view:
The assigned policy.
The parent group from which the target inherits the policy, if the case.
If the group is forcing the policy, you can click its name to view the Policy Assignment page with this group as target.
The enforcement status.
This status shows whether the target is forcing policy inheritance or is forced to inherit the policy:
Forcing: The policy is forced to child groups.
Is forced: The policy is inherited and forced from above.
N/A: No forced policy.
Notice the targets with enforced policy (Is forced status). Their policies cannot be replaced. In such case, a warning message is displayed.
In case of warning, click the Exclude these targets link to continue.
Choose one of the available options to assign the policy:
Assign the following policy template - to appoint a specific policy directly to the target endpoints.
Inherit from above - to use the policy of the parent group.
If you chose to assign a policy template:
Select the policy from the drop-down list.
Select Force policy inheritance to child groups to achieve the following:
Assign the policy to all descendants of the target groups, with no exception.
Prevent changing it from elsewhere lower in the hierarchy.
A new table displays recursively all affected endpoints and groups of endpoints, together with the policies that will be replaced.
Click Finish to save and apply changes. Otherwise, click Back or Cancel to return to the previous page.
When finished, policies are pushed to target endpoints immediately. Settings should be applied on endpoints in less than a minute (provided they are online). If an endpoint is not online, settings will be applied as soon as it gets back online.
To check if the policy was successfully assigned:
In the Network page from the left side menu, click the name of the endpoint you are interested in. Control Center will display the Information window.
Check the Policy section to view the status of the current policy. It must show Applied
Another method to check the assignment status is from the policy details:
Go to the Policies page from the left side menu.
Find the policy you assigned.
In the Active/Applied/Pending column, you can view the number of endpoints for each of the three statuses.
Click any number to view the list of endpoints with the respective status in the Network page.
Assigning rule-based policies
The Policies > Assignment Rules page enables you to define user, location and tag-aware policies. For example, you can apply more restrictive firewall rules when users connect to the internet from outside the company or you can enable Web Access Control for users that are not part of the administrators group or to endpoints defined by certain tags.
This is what you need to know about assignment rules:
Endpoints can have multiple policies assigned at the same time through assignment rules, but only one policy can be active at a time.
Policies assigned to endpoints can have different statuses:
Active - the policy in use on the endpoint.
Applied - the policy has been received by the endpoint.
Pending - the policy has not been received by the endpoint yet.
To view the list of policies assigned to an endpoint, click the endpoint name on the Network page and go to the Policy tab. For details about policy statuses, refer to Viewing endpoint details.
A policy applied through a rule becomes active when the conditions defined in the assignment rule are met.
A policy assigned through a rule will overwrite the device policy set on the endpoint.
The device policy is usually the default policy or the policy manually applied by the network administrator.
If none of the assignment rules applies, the device policy remains active.
Rules are ordered and processed by priority, where
1is the highest priority. You may have several rules for the same target.In such case, the first rule that matches the active connection settings on the target endpoint will apply.
For example, if an endpoint matches a tag rule with priority 5, a user rule with priority 4 and a location rule with priority 3, the location rule will apply.
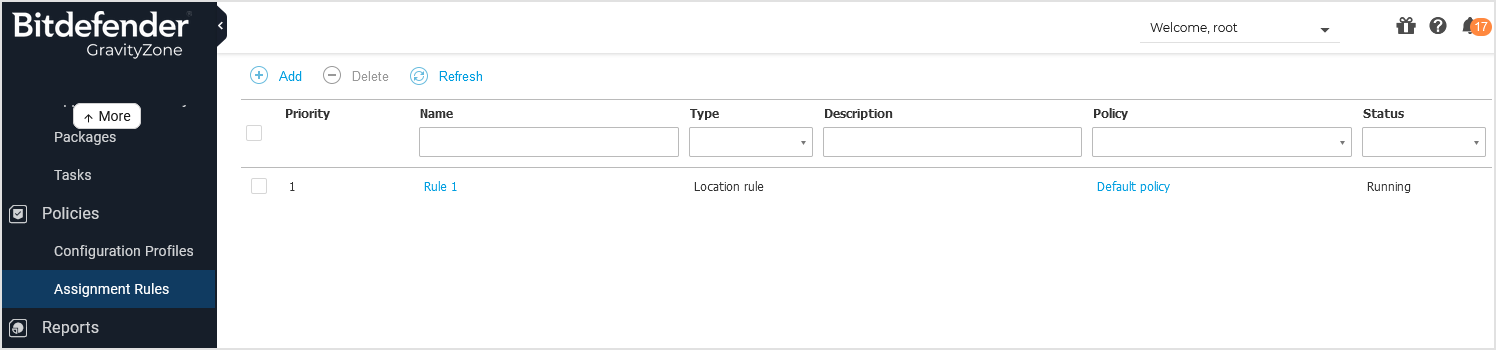
In the Assignment rules table, you can search and sort rules by priority, name, type, description, policy, and status. The status of a rule can be:
Running - the rule is active and applicable to the endpoints.
No target - the rule is not applied to the endpoints because it is missing targets. This situation may occur when the folders in the Network inventory selected as targets have been deleted after creating the rule.
Important
Make sure you consider sensitive settings such as exclusions, communication or proxy details when creating rules.
As best practice, it is recommended to use policy inheritance to keep the critical settings from the device policy also in the policy used by assignment rules.
Note
Uninstall password, encryption and decryption settings are managed exclusively by device-type policies. These settings cannot be managed by rule-based policies.
To create a new rule:
Log in to GravityZone Control Center.
Go to the Assignment Rules page from the left side menu.
Click the
 Add button at the upper side of the table.
Select the rule type:
Configure the rule settings as needed.
Click Save to save the changes and apply the rule to target endpoints of the policy.
To change the settings of an existing rule:
In the Assignment Rules page, find the rule you are looking for and click its name to edit it.
Configure the rule settings as needed.
Click Save to apply the changes and close the window. To leave the window without saving changes, click Cancel.
If you no longer want to use a rule, select the rule and click the  Delete button at the upper side of the table. Click Yes to confirm your action.
To make sure the latest information is being displayed, click the  Refresh button at the upper side of the table.
Configuring location rules
A location is a network segment identified by one or several network settings, such as a specific gateway, a specific DNS used to resolve URLs, or a subset of IPs. For example, you can define locations such as the company's LAN, the servers farm or a department.
In the rule configuration window, follow these steps:
Enter a suggestive name and a description for the rule you want to create.
Set the priority of the rule. The rules are ordered by priority, with the first rule having the highest priority. The same priority cannot be set twice or more.
Select the policy for which you create the assignment rule.
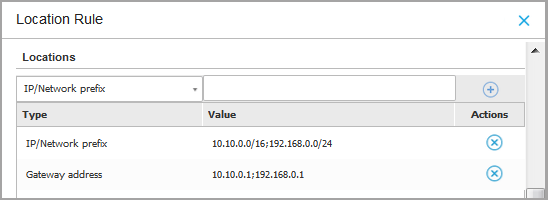
Define the locations to which the rule applies.
Select the type of the network settings from the menu at the upper side of the Locations table. These are the available types:
Type
Value
IP/IP address range
Specific IP addresses in a network or sub-networks. For sub-networks use the CIDR format.
For example:
10.10.0.12or10.10.0.0/16Gateway address
IP address of the gateway
For example:
10.0.2.2WINS server address
IP address of the WINS server
Important
This option does not apply on Linux and macOS systems.
DNS server address
IP address of the DNS server
You can add up to 30 IP addresses and maximum 480 characters.
DHCP connection DNS suffix
DNS name without the hostname for a specific DHCP connection
For example:
hq.company.bizEndpoint can resolve host
Hostname
For example:
fileserv.company.bizEndpoint can connect to GravityZone
Yes/No
Important
This option does not apply on macOS systems.
Network type
Wireless/Ethernet
When choosing Wireless, you can also add the network SSID.
Important
This option does not apply on Linux systems.
Hostname
Hostname
For example:
cmp.bitdefender.comImportant
You can also use wildcards. Asterisk (*) substitutes for zero or more characters and the question mark (?) substitutes exactly one character. Examples:
*.bitdefender.comcmp.bitdefend??.comImportant
This option does not apply on macOS systems.
Enter the value for the selected type. Where applicable, you can enter multiple values in the dedicated field, separated by semicolon (;) and without additional spaces. For example, when you enter
10.10.0.0/16;192.168.0.0/24, the rule applies to target endpoints with the IPs matching ANY of these sub-networks.Warning
You can use only one network setting type per location rule. For example, if you added a location using the IP/network prefix, you cannot use this setting again in the same rule.
Click the
 Add button at the right side of the table.
Important
The network settings on endpoints must match ALL provided locations for the rule to apply to them.
For example, to identify the office LAN network you can enter the gateway, network type and DNS; furthermore, if you add a sub-network, you identify a department within the company's LAN.
Click the Value field to edit the existing criteria and then press
Enterto save changes.To remove a location, select it and click the
 Delete button.
You may want to exclude certain locations from the rule. To create an exclusion, define the locations to be excepted from the rule:
Select the Exclusions check box under the Locations table.
Select the type of the network settings from the menu at the upper side of the Exclusions table. You have the same options as in the Locations table.
Enter the value for the selected type. You can enter multiple values in the dedicated field, separated by semicolon (;) and without additional spaces.
Click the
Add button at the right side of the table.
The network settings on endpoints must match ALL conditions provided in the Exclusions table for the exclusion to apply.
Click the Value field to edit the existing criteria and then press
Enterto save changes.To remove an exclusion, click the
Delete button at the right side of the table.Important
Exclusions also work as negative conditions and you can create rules based only on them. In such a rule, the Locations table has no entries.
Examples:
When you enter
10.10.0.0/16;192.168.0.0/24as an exclusion, the rule applies to all target endpoints with IPs that do NOT match ANY of these sub-networks.When you specify
Wirelessfor the network type and the stringcmp1.bitdefender.com;cmp2.bitdefender.com;cmp3.bitdefender.comfor the hostnames as exclusions, the rule applies to target endpoints that do NOT connect wirelessly AND whose names do NOT match ANY of these entries.
In the Targets section, select the view (Computers and Virtual Machines or Cloud Workloads) and the folders in the network where you want to apply the policy rule. You can view your selection in the table on the right, under Selected Groups.
Note
If you do not specify any targets in any view (Computers and Virtual Machines or Cloud Workloads), GravityZone automatically selects all available entities when you save the rule.
Click Save to save the assignment rule and apply it.
Once created, the location rule automatically applies to all target endpoints that you manage according to your user rights.
Configuring user rules
Important
You can create user rules only if an Active Directory integration is available.
You can define user rules only for Active Directory users, groups, and organizational units (OUs).
When an organizational unit is selected as target, the rule applies to users in that OU but not to security groups that include those users.
Rules based on Active Directory groups are not supported on Linux systems.
In the rule configuration window, follow these steps:
Enter a suggestive name and a description for the rule you want to create.
Set the priority. The rules are ordered by priority, with the first rule having the highest priority. The same priority cannot be set twice or more.
Select the policy for which you create the assignment rule.
In the Targets section, select the organizational units (OUs), users, and security groups you want the policy rule to apply to.
The following object classes are displayed in the Active Directory tree:
 - Domain
 - Organizational unit (OU)
 - Container
 - Security group
 - User
You can view your selection in the table on the right.
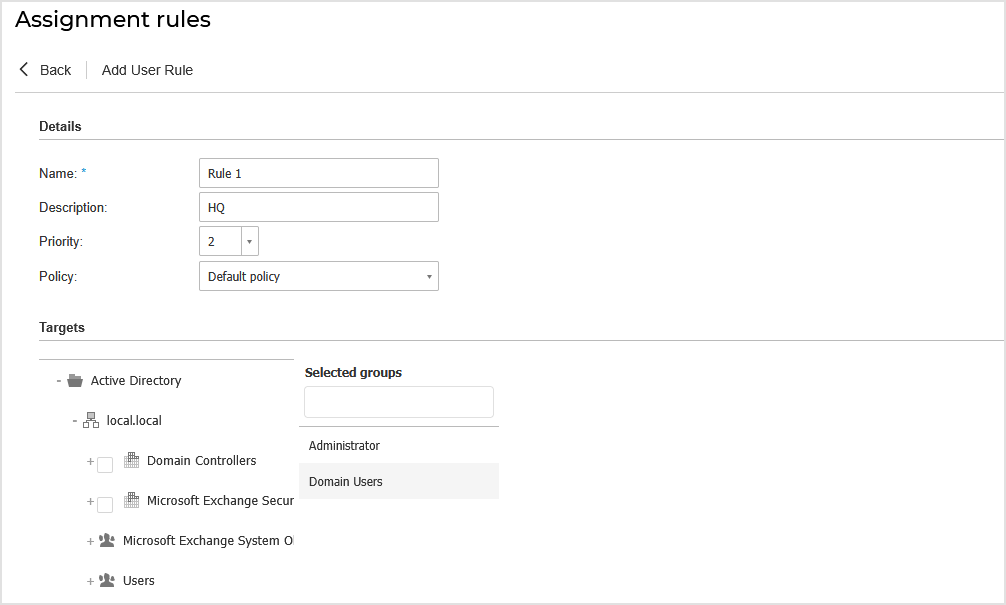
Click Save.
Once created, the user-aware rule applies to managed target endpoints at user login.
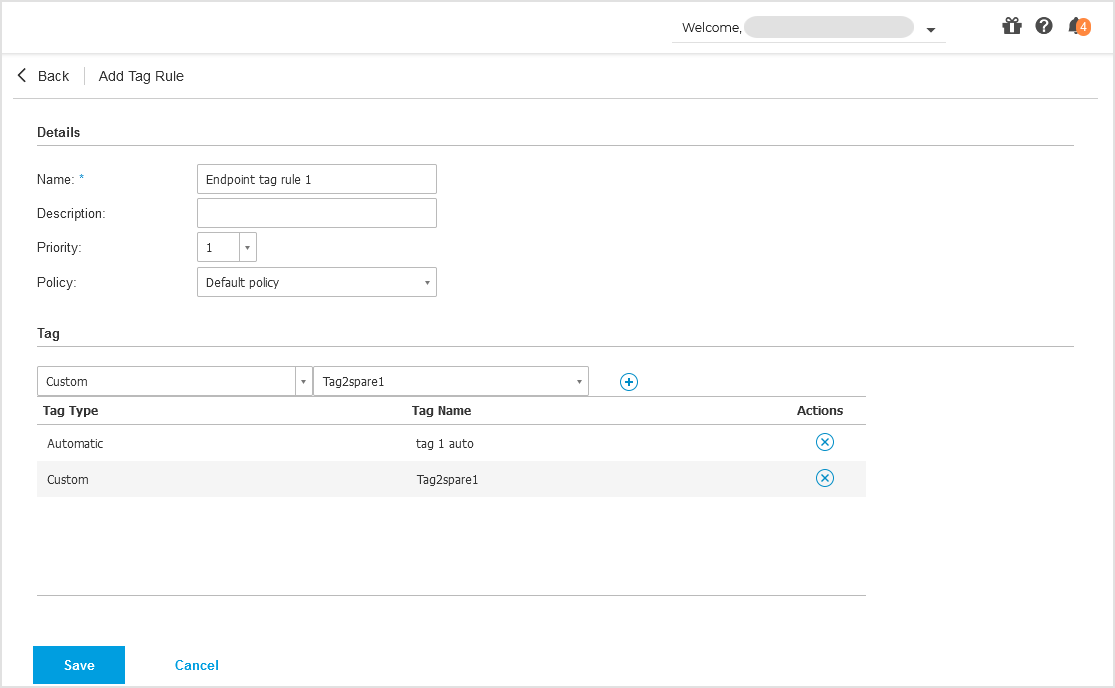
Configuring endpoint tag rules
To assign policies to new and existing endpoints in a fast and efficient way, you can use rules based on tags. Each rule can have one or more tags. A rule with multiple tags uses the AND operator, meaning an endpoint must have all specified tags for the rule to apply.
Rules can include both custom and automatic tags.
For example, suppose you created the automatic tag Linux to apply to endpoints running this operating system. You then created a rule based on this tag that assigns a security policy with specific settings. As a result, whenever GravityZone detects a new Linux machine on the network, the endpoint automatically receives the tag Linux and the corresponding policy.
For details on creating and assigning tags to endpoints, refer to Using endpoint tags.
To configure an endpoint tag rule, follow these steps:
Enter a suggestive name and description.
Set the priority of the rule.
The rules are ordered by priority, with the first rule having the highest priority. For example, priority 1 is higher than priority 2. The same priority cannot be set twice.
Select the policy for which you create the tag rule.
In the Tag grid, add at least one tag.
Click Save to create the rule.
Once created, the rule automatically applies to all endpoints that have the specified tags.
Configuring integration tag rules
Important
You can create integration tag rules only if an Amazon EC2 or Microsoft Azure integration is available.
You can use the tags defined in the cloud infrastructures to assign a specific GravityZone policy to your virtual machines hosted in the cloud. All virtual machines having the tags specified in the tag rule will be applied with the policy set by the rule.
Note
According to the cloud infrastructure, you can define the virtual machine tags as follows:
For Amazon EC2: in the Tags tab of the EC2 instance.
For Microsoft Azure: in the Overview section of the virtual machine.
A tag rule can contain one or several tags. To create a tag rule:
Enter a suggestive name and a description for the rule you want to create.
Set the priority of the rule. The rules are ordered by priority, with the first rule having the highest priority. The same priority cannot be set twice or more.
Select the policy for which you create the tag rule.
In the Tag table, add one or several tags.
A tag consists in a case-sensitive key-value pair. Make sure to enter the tags as defined in your cloud infrastructure. Only valid key-value pairs will be taken into account.
To add a tag:
In the Tag Key field, enter the key name.
In the Tag Value field, enter the value name.
Click the
Add button at the right side of the table.
For more information about tagging EC2 managed instances, refer to the official Amazon EC2 documentation.
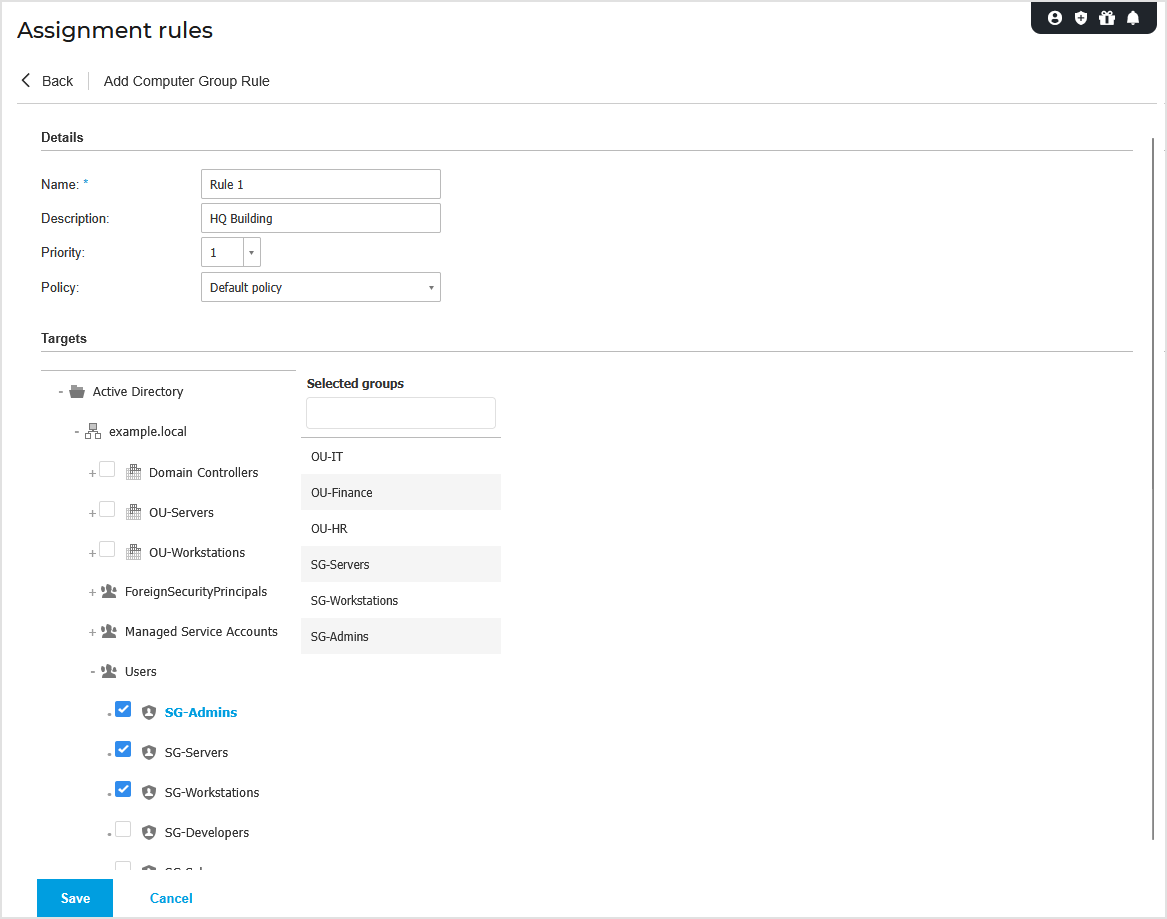
Configuring computer group rules
You can use computer group rules in Active Directory environments where endpoints are organized into different organizational units (OUs) to apply tailored security policies across departments or device types.
Important
You can create computer group rules only if an Active Directory integration is available.
You can define computer group rules only for Active Directory organizational units (OUs) and security groups that contain computer objects.
When an organizational unit is selected as target, the rule applies to computers in that OU but not to nested groups that include those computers.
Rules based on Active Directory security groups that contain computer objects are not applied to Linux endpoints.
In the rule configuration window, follow these steps:
Enter a suggestive name and a description for the rule you want to create.
Set the priority. The rules are ordered by priority, with the first rule having the highest priority. The same priority cannot be set twice or more.
Select the policy for which you create the assignment rule.
In the Targets section, select the organizational units (OUs) and security groups containing computer objects you want the policy rule to apply to.
The following object classes are displayed in the Active Directory tree:
- - Domain
- - Organizational unit (OU)
- - Container
- - Security group
You can view your selection in the table on the right.
Click Save.
Once created, the computer group rule applies to managed target endpoints at user login.