VMware NSX-T
GravityZone Security for Virtualized Environments integrates with the VMware NSX-T Data Center through NSX-T Manager.
Effective August 31, 2025, Bitdefender no longer supports or releases product updates for VMware NSX-T and NSX-V. For more information, refer to End-of-life and support for GravityZone Security for Virtualized Environments integrations with VMware NSX-T and VMware NSX-V.
Integrate with NSX-T Manager
NSX-T Manager is the management plane of your vCenter Servers integrated with an NSX-T Data Center. For the integration to work, you will need to set up the integration for vCenter Servers associated with the NSX-T Manager. For more information, refer to Integrate with vCenter Server.
Integrate GravityZone with vCenter Server
Important
Bitdefender Endpoint Security Tools must not be installed on virtual machines alongside an NSX-T integration.
Add a new VMware vCenter Server integration to the GravityZone Control Center by following these steps:
Log in to GravityZone Control Center.
Go to the Configuration page from the left side menu.
Navigate to Virtualization Providers > Management Platforms.
Click Add and select vCenter Server from the menu.
Specify the vCenter Server details.
Specify the credentials for vCenter Server authentication.
Note
You can choose to use the credentials provided for an integration with Active Directory or a different set of credentials. The user whose credentials you provide must have root or administrator permissions on the vCenter Server.
Under Installed platforms choose None for your NSX-T integration.
Click Save to complete the vCenter Server integration with Control Center.
Note
Before accepting the self-signed security certificate required for the integration, make sure it corresponds with the vCenter details.
For more information, refer to Integrating with vCenter Server.
Note
For multiple vCenter Servers managed by NSX-T Manager, you need to repeat this step.
Download NSX-T SVA
Log in to GravityZone Control Center.
Go to the Configuration > Update page from the left side menu.
Select the Components tab.
Under Product, select Security Server (VMware NSX-T).
From the Packages section, select the associated check box to download.
Integrate GravityZone with NSX-T Manager
Add a new VMware NSX-T Manager integration to the GravityZone VA by following these steps:
Important
Each VMware NSX-T Manager integration can only be added to one GravityZone VA.
In Control Center, go to the Configuration page from the left side menu.
Navigate to Virtualization Providers > Security Providers.
Click Add to configure the NSX-T integration.
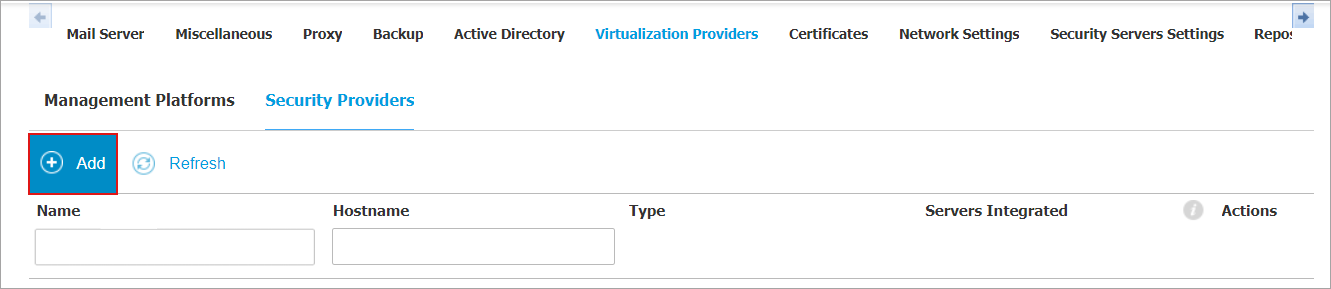
Specify the NSX-T integration details:
Name of the NSX-T integration
Hostname or the IP address of the NSX Manager system
NSX-T port (the default is
443)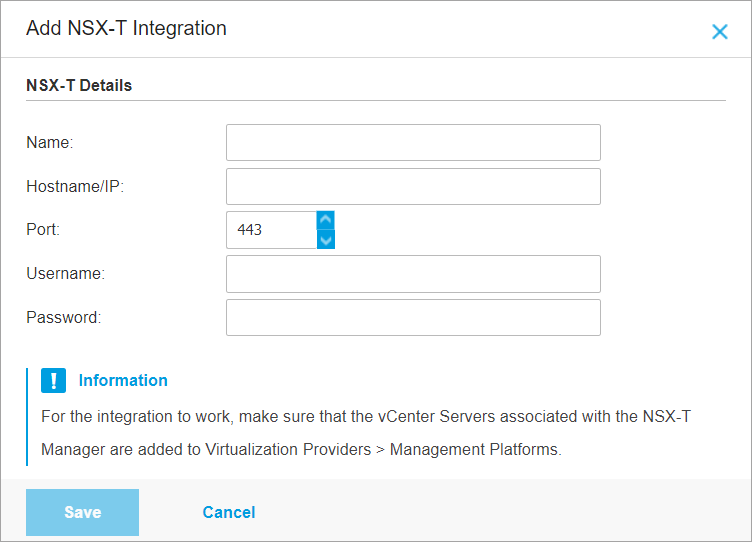
Specify the credentials for NSX-T Manager authentication.
Note
The user whose credentials you provide must have root or administrator permissions on the NSX-T Manager.
Click Save to complete the integration.
Note
Integrated server count within NSX-T manager should match the one from the Management Platform within the Control Center. If the count is not matched, follow the integration procedure to add a new vCenter Server integration.
Manage endpoint protection in VMware NSX-T
In this section, you will learn how to apply endpoint protection to your guest virtual machines.
Integration Overview
NSX-T Data Center provides agentless endpoint protection capabilities through the Guest Introspection ecosystem. Bitdefender integrates with the NSX ecosystem to protect guest virtual machines by using a Security Server deployed at the hypervisor host level.
This section provides guidance for NSX-T Data Center administrators on how to configure and apply endpoint protection to guest VMs, by implementing a Bitdefender GravityZone Guest Introspection policy.
Prerequisites
Software Prerequisites
For more information about compatibility with NSX-T Data Center, refer to Version compatibility between Bitdefender GravityZone and VMware NSX-T.
NSX-T Manager configuration prerequisites
Before you start the Bitdefender GravityZone configuration and the Security for Virtualized Environments service deployment, you need to meet the following conditions:
The NSX-T Manager is connected to all target Compute Manager (vCenter Servers) and all ESXi hosts target cluster members have NSX drivers installed. For more information, refer to the official NSX product documentation, based on the NSX version you're using.
All target VMs are running a compatible version of VMware Tools with the NSX Guest Introspection driver installed. For more information, refer to Installing Guest Components.
Process Description
To manage endpoint protection in NSX Manager you must follow these steps:
Deploy Partner service (Bitdefender GravityZone) in NSX Manager
Deploy the Security Server installation as a Partner service in NSX-T Manager.
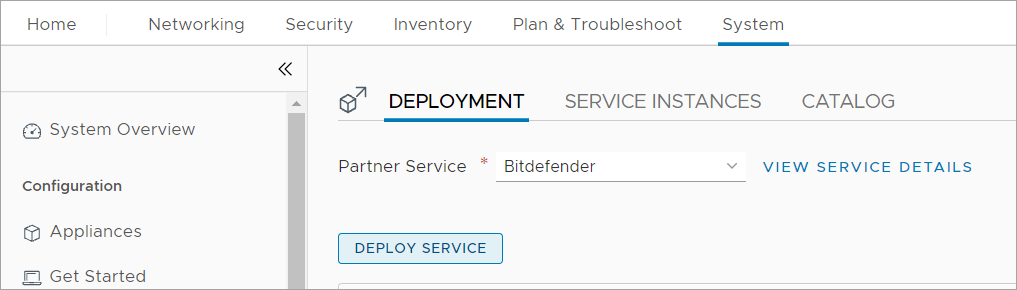
In NSX Manager, go to the System page and click Service Deployment.
Select Partner service and then click Deploy Service.
Specify the service deployment details:
Enter the service deployment name.
In the Compute Manager field, select the vCenter (Bitdefender SVA).
In the Cluster field, select the cluster where the service needs to be deployed.
In the Data Store field, you can select a data store where the SVA is deployed.
For more information, refer to the official VMware documentation.
Under the Networks column, click Set to configure the Management Network interface.
A configuration window is displayed, where you can configure the network/distributed switch to use for the management NIC and the network type.
In the Deployment Specification field, select Bitdefender SVA – Medium.
In the Deployment Template field, select Bitdefender Security Server OVF Template.
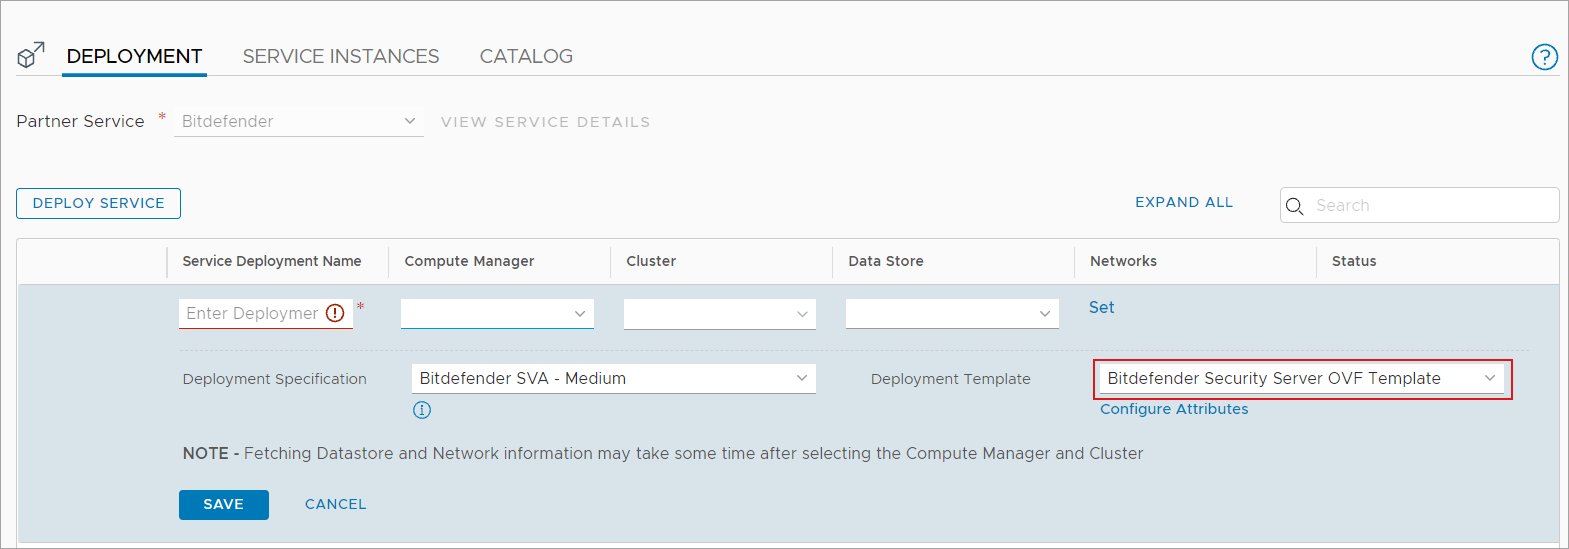
Click Save.
The Bitdefender Security Server is deployed.
Configure NSX Groups
NSX groups are used as source and destination field of a service profile. Create groups in the NSX Manager for protected, unprotected VMs and affected (quarantined) VMs.
To create and define group memberships, follow these steps:
Protected VMs Group
Create a group for protected VMs by following these steps:
In NSX Manager, go to the Inventory page and click Groups.
Click ADD GROUP to configure the group.
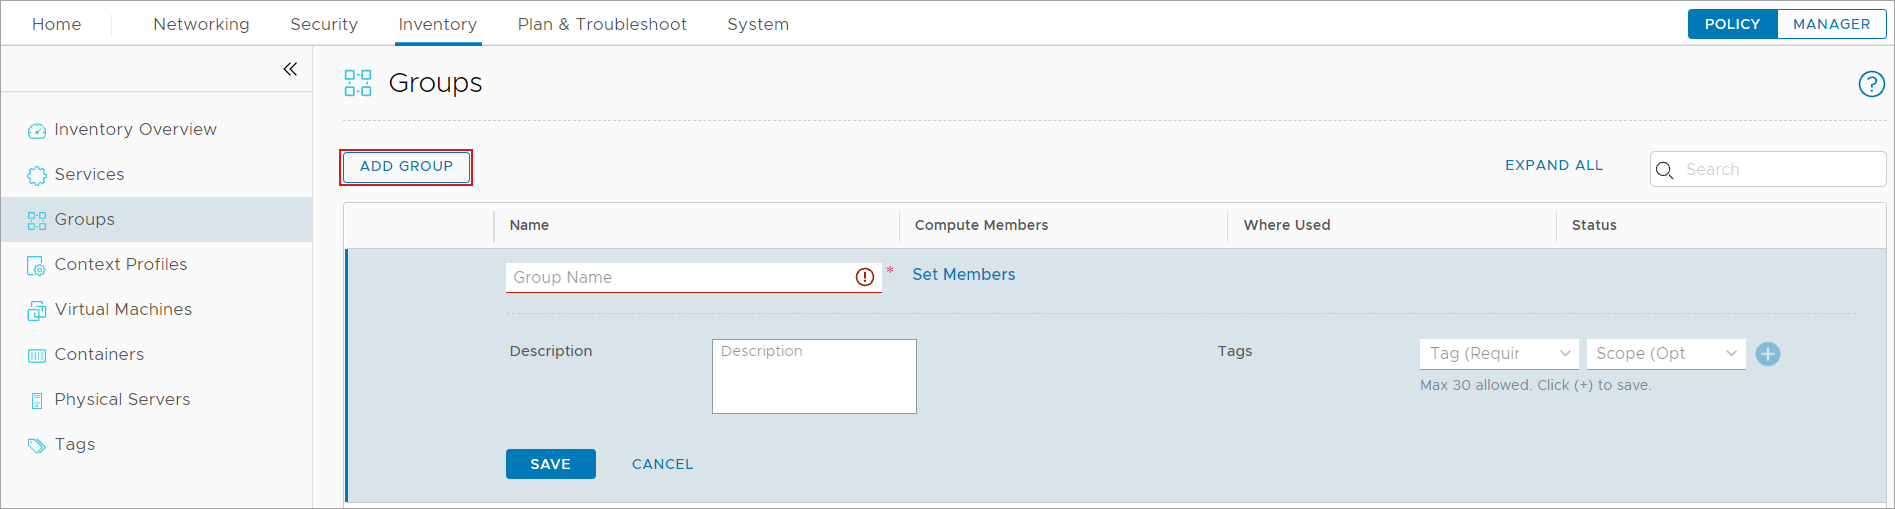
Specify the group details:
Enter the security group name.
Under the Compute Members, click Set Members to define membership of the group:
Go to the Members tab and select a group from the Category drop-down menu.
Select the nodes that should be protected.
Click APPLY.
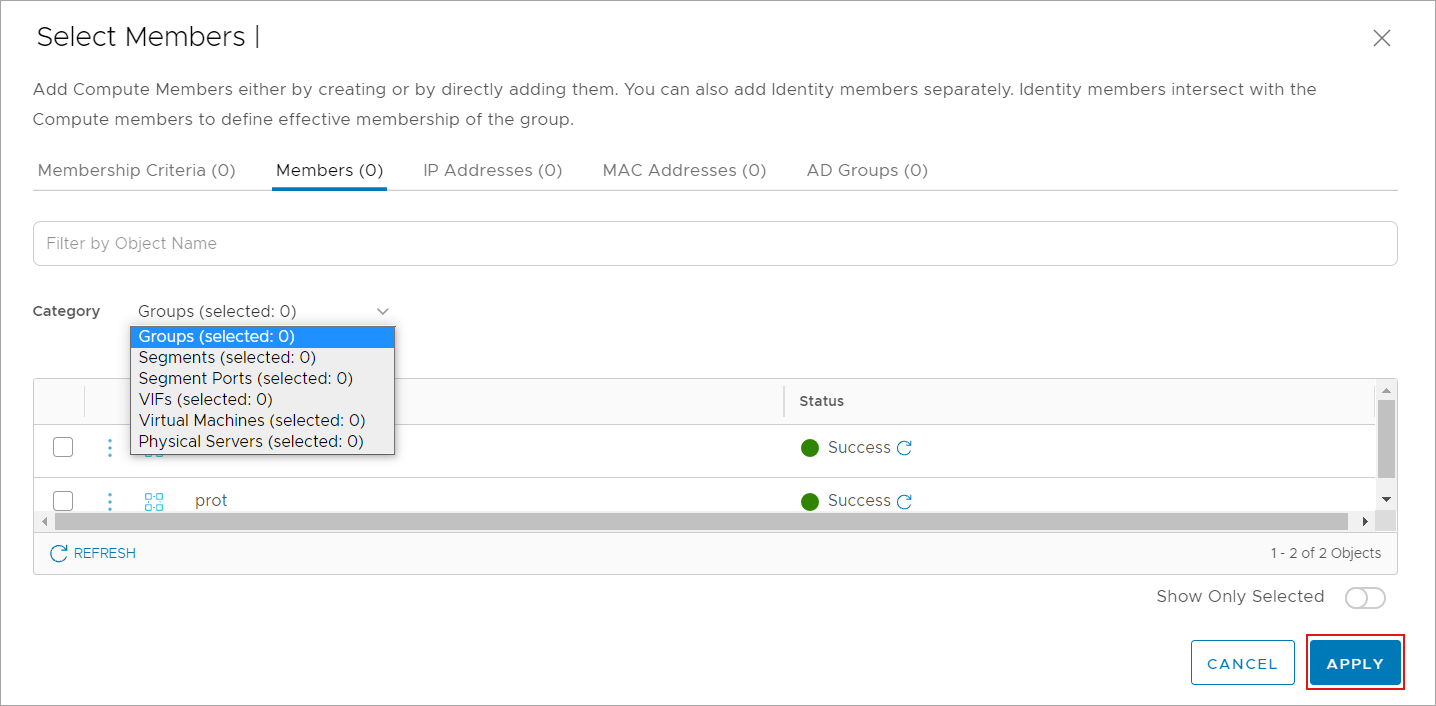
For more information, refer to the official VMware documentation.
Click SAVE.
The group for the protected VMs is now added.
Unprotected VMs Group
To create a group and define membership for unprotected VMs, follow the previous 1-4 steps from Protected VMs Group.
Affected VMs Group
Create a quarantine group for affected VMs by following these steps:
In NSX Manager, go to the Inventory page and click Groups.
Click ADD GROUP to configure the group.
Specify the group details:
Enter the security group name.
Under Compute Members, click Set Members to define membership of the group:
Go to the Membership Criteria tab and click ADD CRITERIA.
In the third column, select Contains.
In the Scope field, enter the following tag:
ANTI_VIRUSClick APPLY.
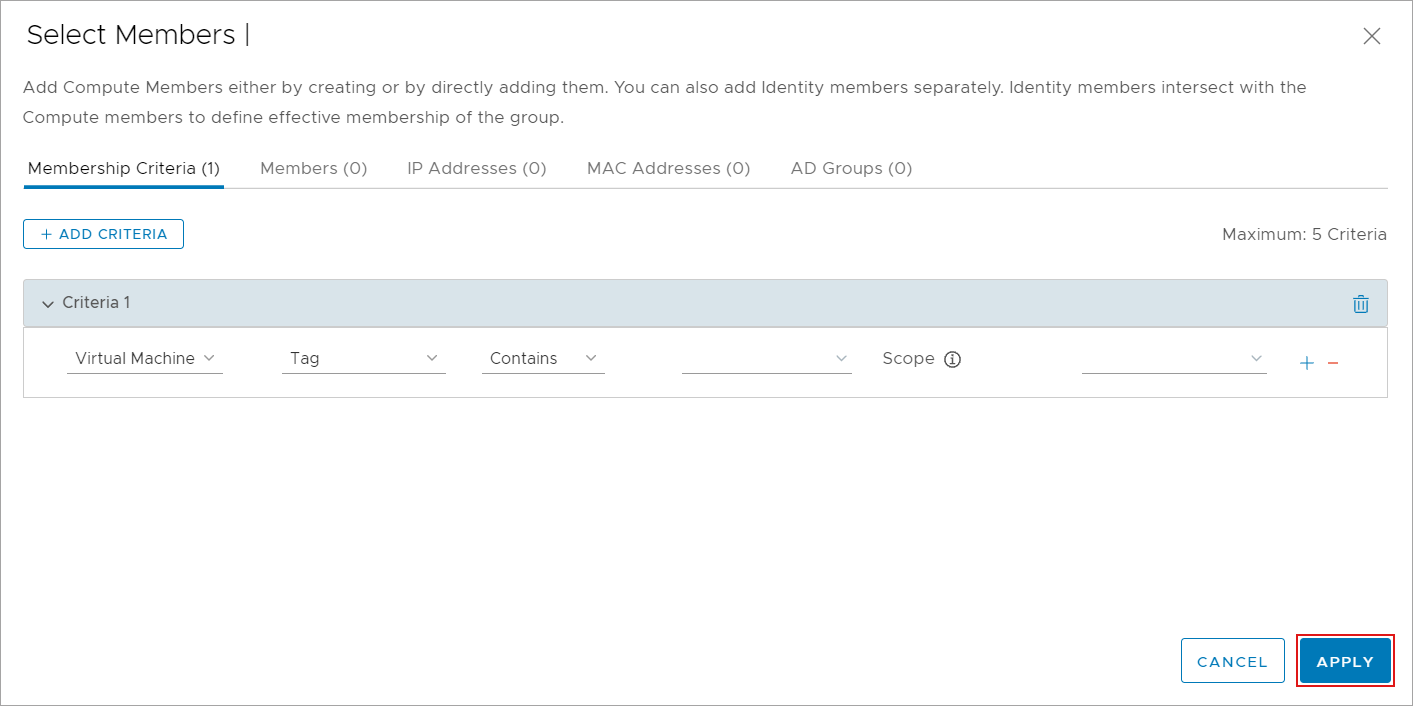
For more information, refer to the following VMware Docs article.
Click SAVE.
The group for the quarantined VMs is now added.
Create GravityZone security policy
Create and configure security policy in Control Center by following these steps:
In Control Center, go to the Policies page from the left side menu.
Click Add to configure a policy.
Enter a name for your policy.
Configure the policy settings as needed.
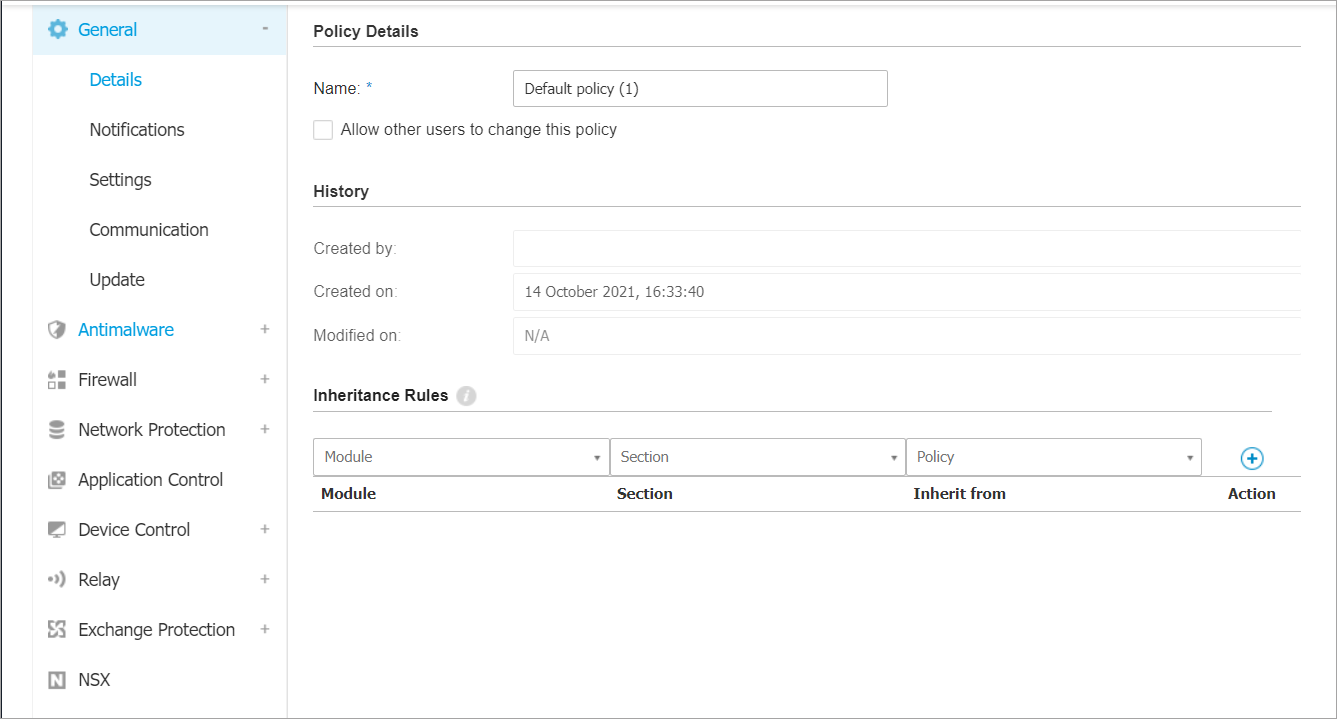
Note
Only Antimalware settings are applicable to NSX-T integrations.
Go to NSX and select the associated check box to set its visibility in NSX-T Manager.

The GravityZone policy is visible in the NSX-T Manager under the Vendor Template column, when you add a Service Profile.
Click Save.
Configure and apply endpoint protection to guest VMs
NSX enforces Guest Introspection policies (GravityZone security policy) when a Service Profile is available. To apply endpoint protection to guest VMs you need to create Service Profile and associate it to a VM group through policy rule.
Configure endpoint protection for guest VMs by following these steps:
Create a Service Profile
Add a Service Profile in NSX Manager by following these steps:
In NSX Manager, go to the Security page and click on Configuration tab.
Navigate to the Endpoint Protection tab and go to SERVICE PROFILES.
In the Partner Service drop-down select Bitdefender and then click ADD SERVICE PROFILE.
Specify the Service Profile details:
Enter the Service Profile name.
Select the vendor template (GravityZone security policy).
Click Save.
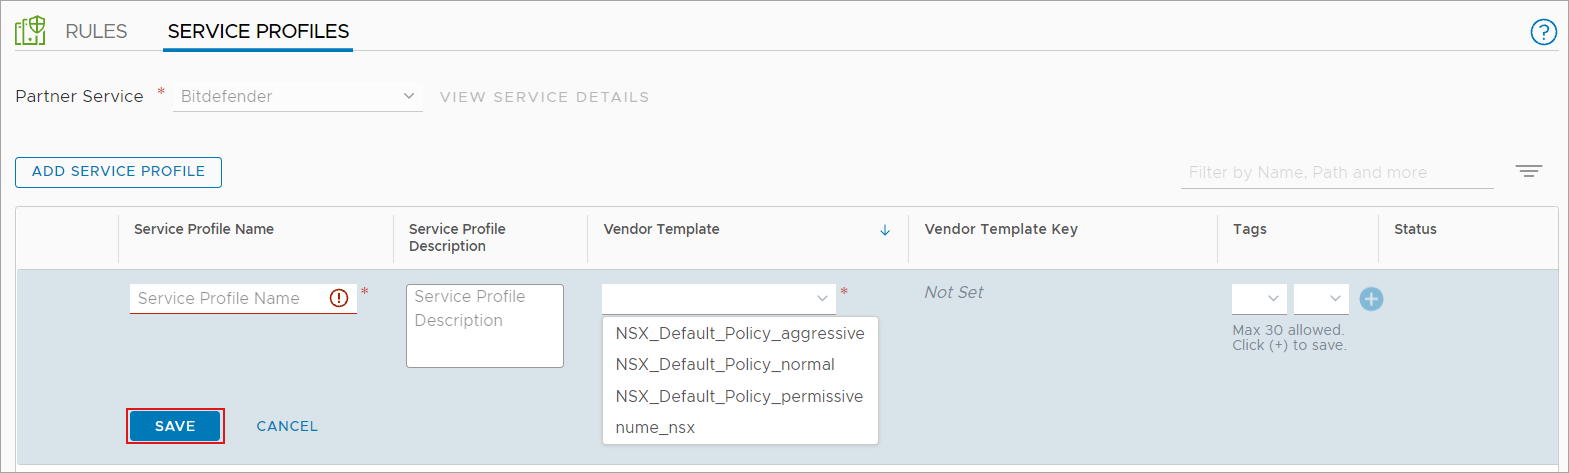
The Service Profile is now added.
Create and publish a policy rule
To associate a VM group that needs to be protected with a specific service profile, you need to create a policy rule. Create a policy for your VM group by following these steps:
In NSX Manager, go to the Security page and click on Configuration tab.
Navigate to the Endpoint Protection tab and go to RULES.
Click ADD POLICY.
Enter a policy name.
Click the three vertical dots to open the dropdown menu.
Click Add Rule.
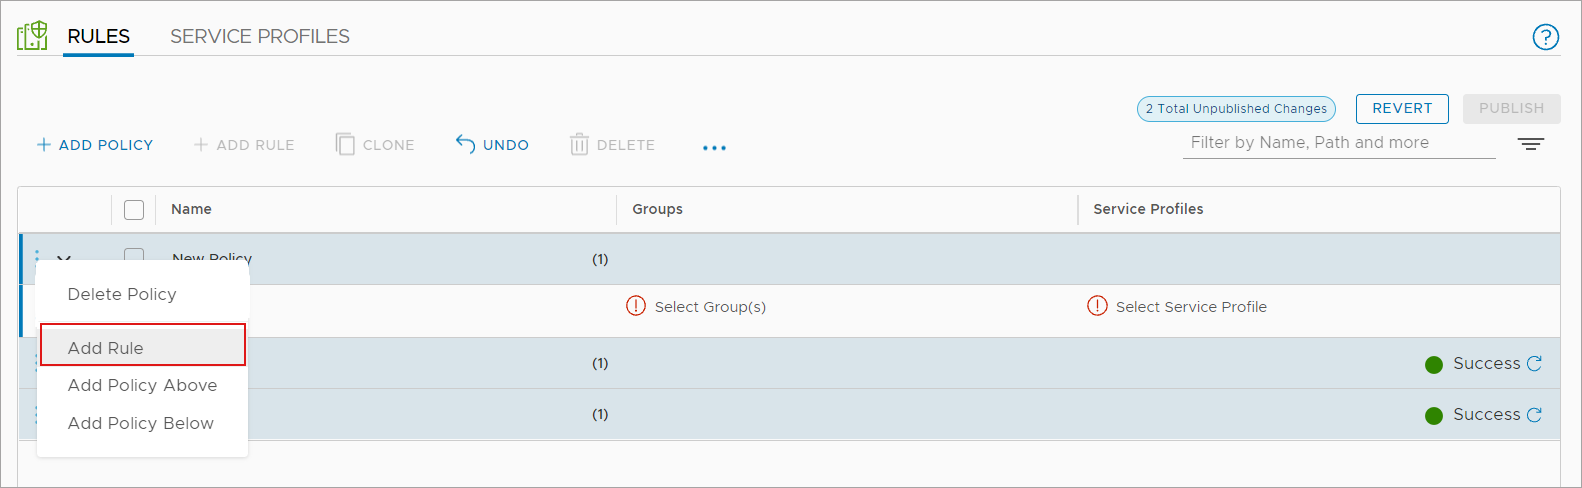
Enter a policy rule name.
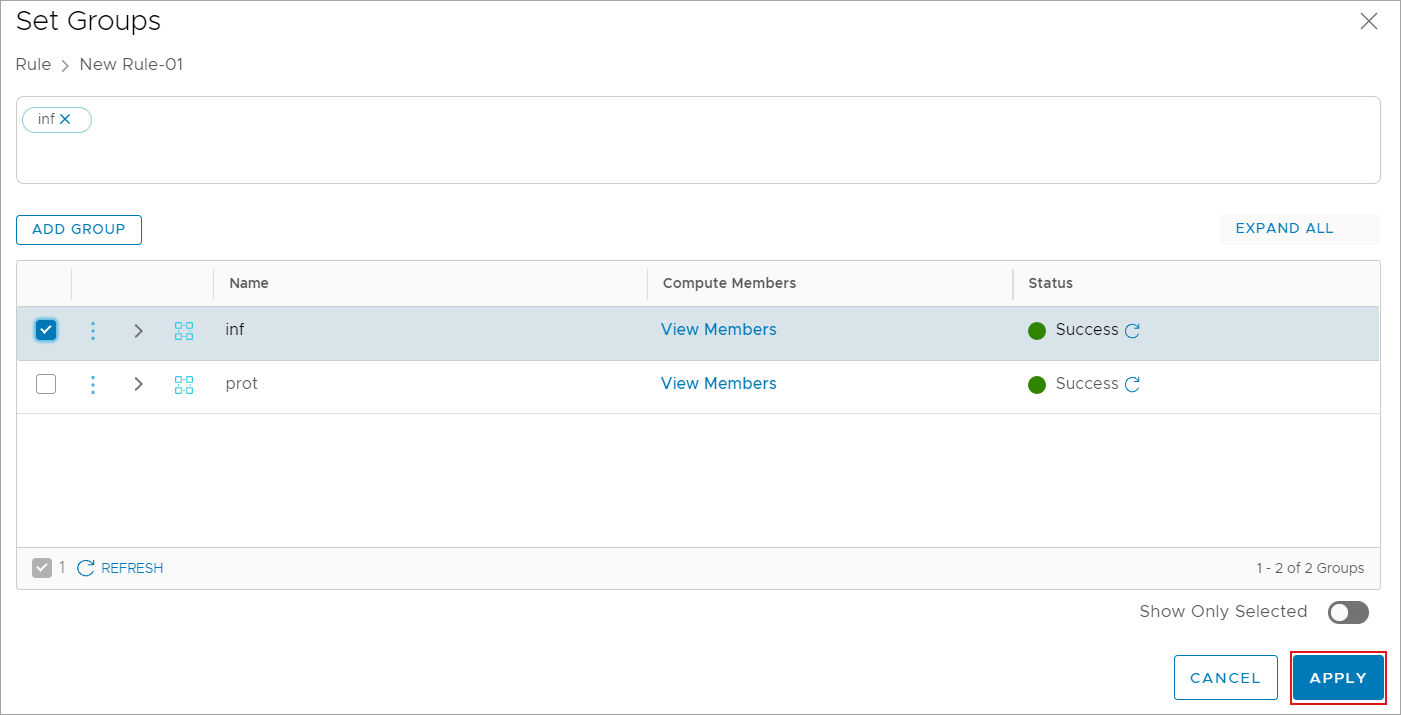
Under the Groups column, click the edit icon to set VM groups:

In the table, select a VM group for this rule.
Click APPLY.
Under the Service Profiles column, click the edit icon to map the Service Profile to your VM groups.
In the table, select the Service Profile and click SAVE.
Click PUBLISH to apply endpoint protection to your guest VMs.

Change the Security Server password
Using the local interface
Open the Security Server console.
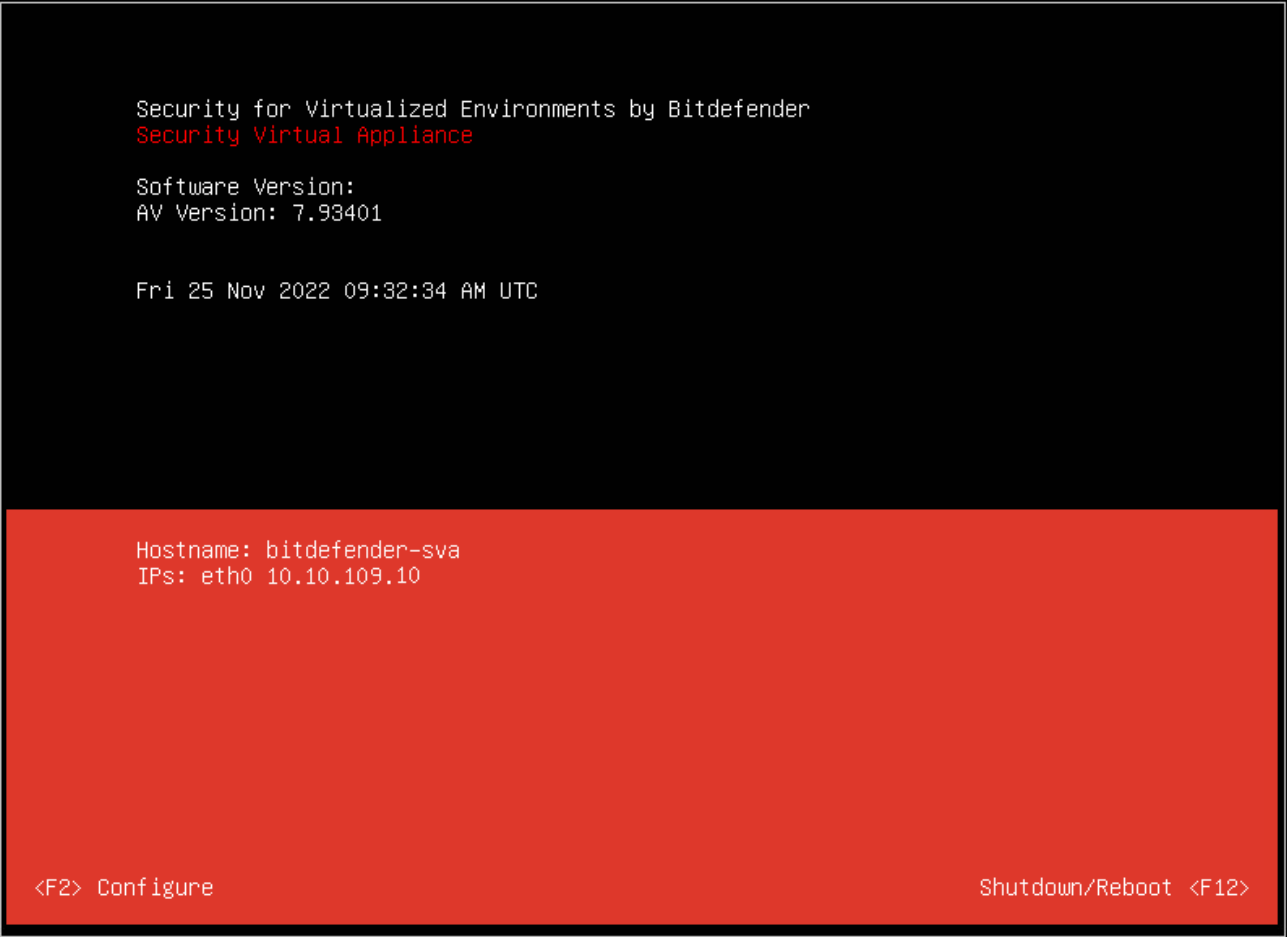
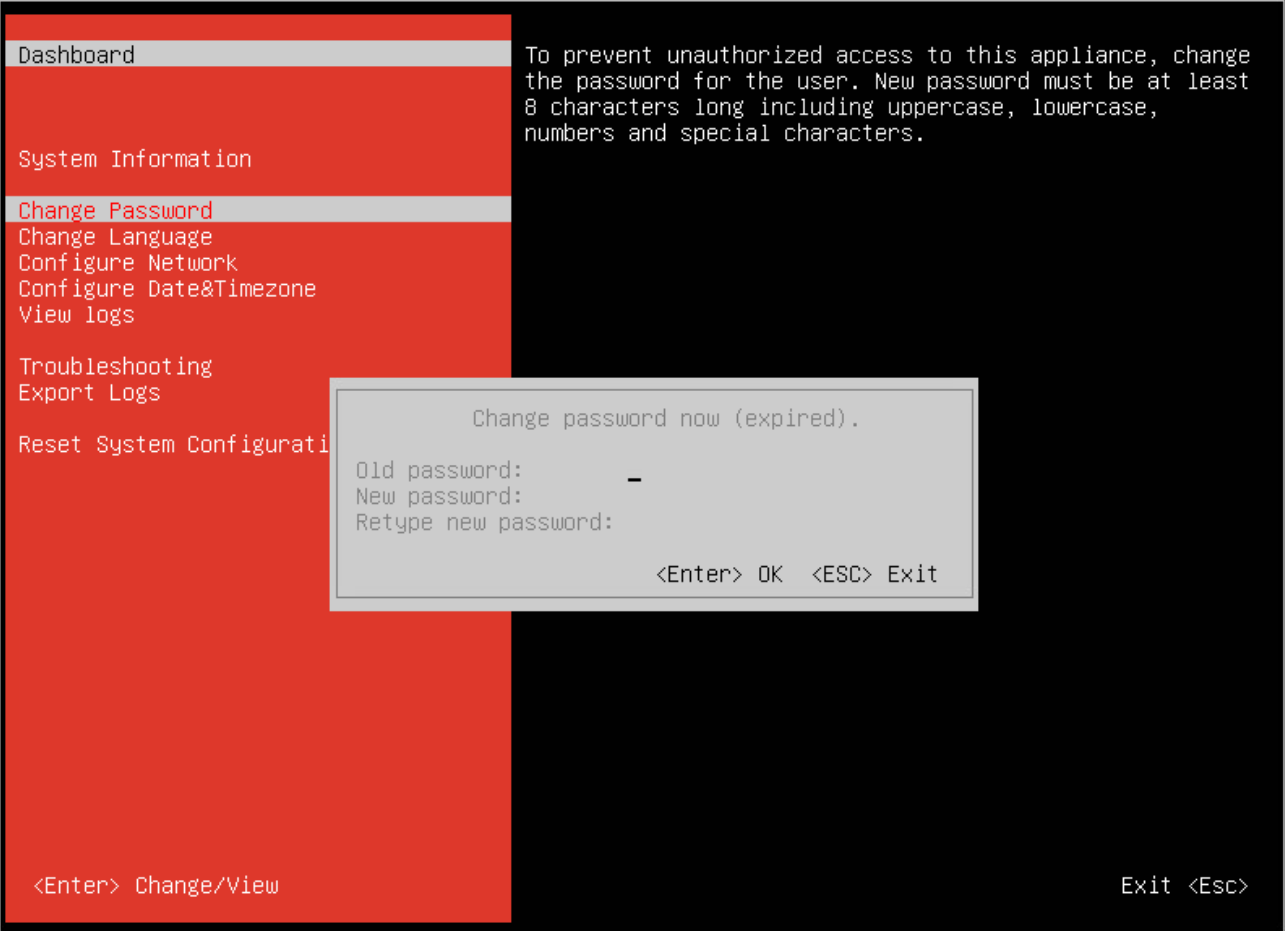
Press F2 to open the configuration screen.
Enter your password. The default password is:
sve.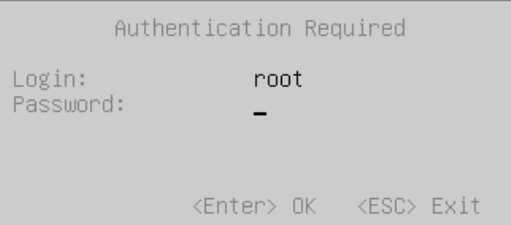
Change the password.
The default password does not meet the new security password requirements, so you have to change it. It must contain at least 8 characters, one digit, at least one upper case character, at least one lower case character, one special character and must be changed every 3 months.
Note
For more information about resetting the
bdadminpassword, refer to Reset the Security Server password.
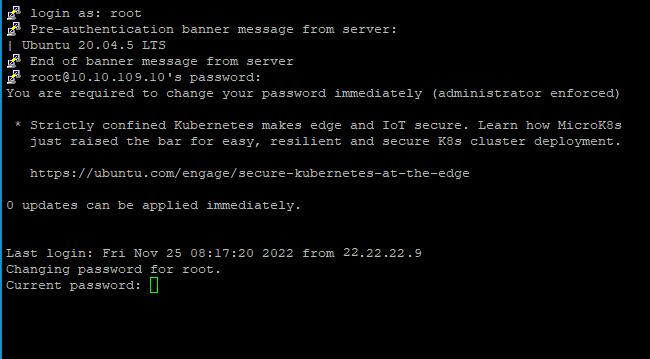
Using SSH
Connect to the appliance via SSH.
Log in using the default credentials.
User name:
bdadminPassword:
sve
Change the password.
The default password does not meet the new security password requirements, so you have to change it. It must contain at least 8 characters, one digit, at least one upper case character, at least one lower case character, one special character and must be changed every 3 months.
Note
For more information about resetting the
bdadminpassword, refer to Reset the Security Server password.
Remove the NSX-T integration
To remove the NSX-T integration, follow these steps:
Log in to NSX Manager.
Go to Security > Endpoint Protection > Rules.
Delete the policy and its assigned rules by clicking Delete.
Go to Security > Endpoint Protection > Service Profiles.
Delete all service profiles you have created.
Go System > Service Deployments > Deployment.
Delete all deployed Security Servers.
Note
If the "Could not find service definition for the given service definition ID" error message is displayed, refer to the official Broadcom documentation.
In GravityZone Control Center, go to Configuration > Virtualization Providers > Security Providers.
Delete the NSX-T Manager integration.