


How to set up the GravityZone integration with Amazon EC2 using a cross-account role
Bitdefender Security for Amazon Web Services is a security solution designed for cloud infrastructures and integrated with GravityZone Cloud Control Center. A comprehensive solution, Bitdefender Security for AWS protects Amazon EC2 instances running Windows and Linux operating systems.
Should you need to subscribe to Bitdefender Security for AWS from Amazon Web Services Marketplace, refer to this KB article.
This article describes how to integrate your Amazon Web Services account with GravityZone Control Center by using a cross-account role.
- Overview
- Prerequisites
- Integrating GravityZone with Amazon Web Services
- Install Protection
- Useful Considerations: changing the External ID, errors, removing the integration
Overview
GravityZone administrators can integrate Control Center with Amazon EC2 by using a cross-account role associated with an IAM (Identity and Access Management) user. To learn more about IAM, refer to this kb article provided by Amazon Web Services.
This procedure replaces the old integration method based on AWS key pairs and reflects the latest version of APIs provided by AWS.
GravityZone integration with Amazon EC2 implies the following security elements:
- Account ID – the unique identifier of the Bitdefender AWS account. The Account ID is necessary for your IAM user to create the GravityZone specific role for cross-account access.
- External ID – a unique identifier linked to your GravityZone company, used for security reasons and necessary to create the GravityZone specific role for cross-account access.
- ARN (Amazon Resource Name) – a unique identifier for AWS resources, associated with a role attached to your AWS user account.
| Note:
It is recommended to set up the Amazon integration using an IAM user account created specifically for this purpose. The IAM user requires IAMFullAccess permission to be able to create the role required for the AWS integration in GravityZone. |
Prerequisites
Before starting to configure the AWS integration:
- Make sure you have the appropriate AWS user account credentials at hand.
- Open the AWS Console and GravityZone Control Center in two browser tabs, at the same time. You will need to work on both of them to create the AWS integration successfully.
Before starting the process, make sure that you change the session timeout in Control Center > My Account from 15 minutes to at least 1 hour. If the session expires, you must restart the integration steps.
Integrating GravityZone with Amazon Web Services
- Log in to Control Center using your GravityZone credentials.
- In the upper-right corner of the console, go to Integrations.
- If you do not have an active integration, click Add > Add Amazon EC2 Integration. The Amazon EC2 Integration Settings window will open.
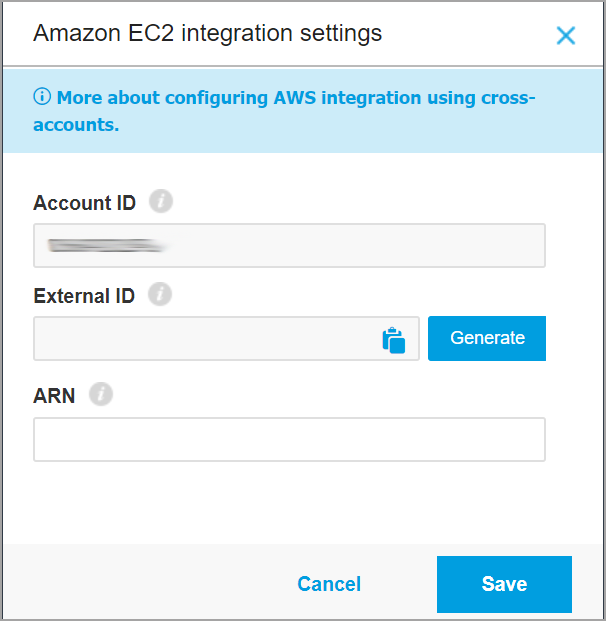
- Under External ID, click the Generate button.
- Open a new tab in your browser and log in to the AWS console.
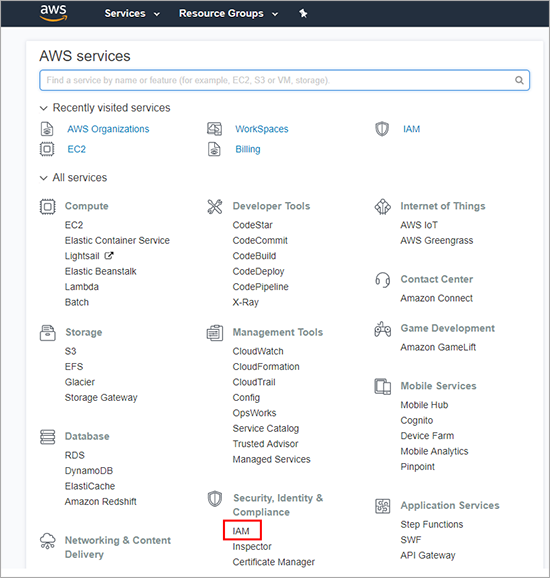
- Click Services at the upper-side of the AWS console and select Security, Identity and Compliance > IAM.
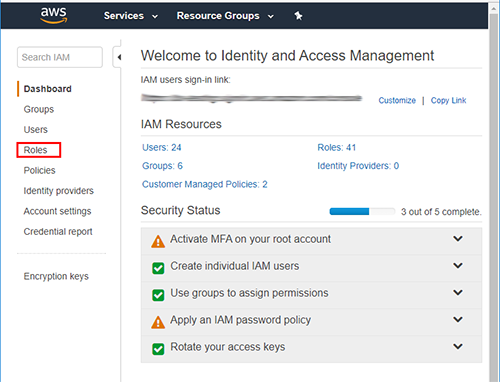
- In the left-side menu, click Roles. A new page is displayed.
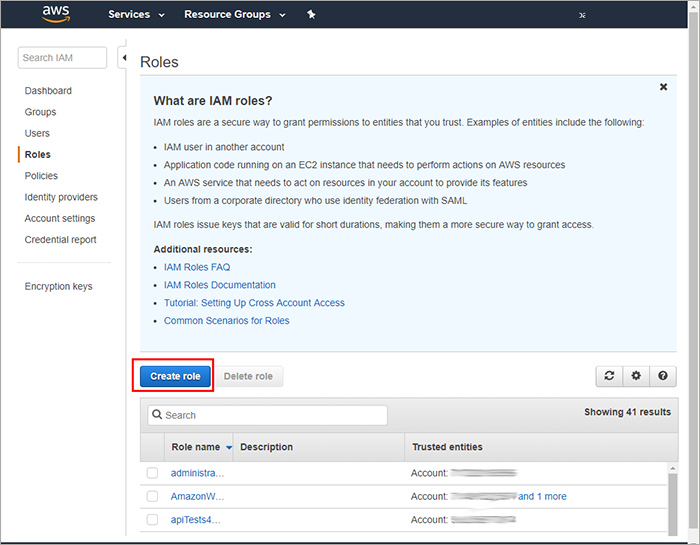
- Click the Create role button.
- Select Another AWS account.
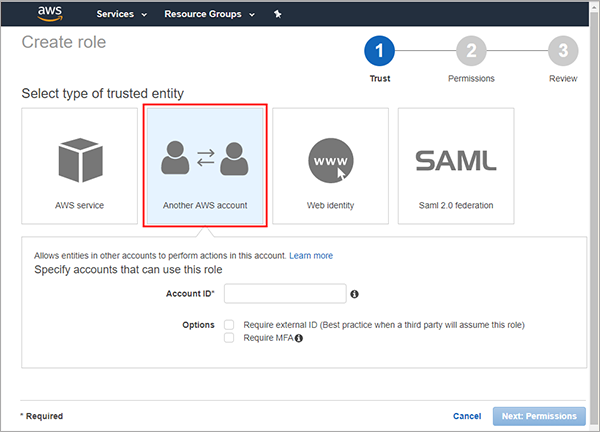
- Switch to Control Center and copy the Account ID from the Amazon EC2 Integration Settings window.
- Go back in AWS console and paste the string in the Account ID field.
- Select Require external ID (Best practice when a third party will assume this role).
- Switch to Control Center and copy the External ID from the Amazon EC2 Integration Settings window. You can do this in two ways:
- Select the string and use CTRL + C.
- Click the Copy to clipboard icon at the end of the string.
- Back in the AWS console, paste the string in the External ID field.
- Click Next: Permissions.
- Check the AmazonEC2ReadOnlyAccess permision and click Next: Review.
- In the new page, provide a name and a description in the required fields.
- Click Create Role. You will view the list of all existing roles. Wait for about 1 minute for the changes to propagate across all AWS regions.
- Click your role name to view the details.
- Copy the ARN.
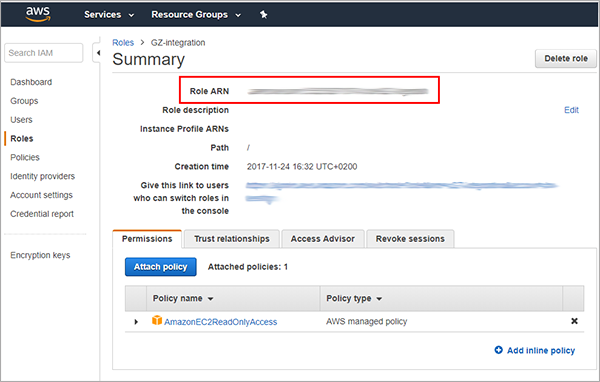
- Switch to the Control Center tab and paste the ARN into the dedicated field.
- Click Save.
GravityZone will import the Amazon EC2 instances in Network, where they will be visible by regions and availability zones.
Control Center automatically synchronizes with Amazon EC2 inventory every 15 minutes. You can also manually synchronize with Amazon inventory using the Synchronize with Amazon EC2 button placed at the upper side of the Network page.
GravityZone Control Center also synchronizes with AWS console each time you click Save in the Amazon EC2 Integration Settings window.
Install Protection
To protect your Amazon EC2 instances, you must install the Bitdefender Endpoint Security Tools agent on them. When installing an agent, you have to assign a Security Server. GravityZone has Security Servers distributed in several AWS regions. Select the Security Server from the same region as your instance.
For more information on installing security agents, refer to GravityZone Installation Guide.
Useful Considerations: changing the External ID, errors, removing the integration
After setting up your integration, you must take into account certain aspects so that you won’t have issues further on.
Changing the External ID for your Amazon EC2 integration
If needed, you can regenerate anytime in Control Center the External ID for your Amazon EC2 integration. This action will invalidate the currently used External ID and the integration. To restore the integration, you have to update your role in the AWS console with the new External ID.
This is how you change the External ID:
- Go to Integrations.
- Click the existing Amazon EC2 integration. The Amazon EC2 Integration Settings window will open.
- Click Generate. A warning message will inform you that the new External ID will invalidate the current one. Also, your current integration will become invalid until you update your AWS role with the External ID.
- Click Confirm.
- Copy the newly-generated External ID.
- Log in to the AWS console in a new browser tab.
- Go to Services > IAM > Roles and select your role.
- Go to Summary > Trust Relationship and click Edit trust relationship.
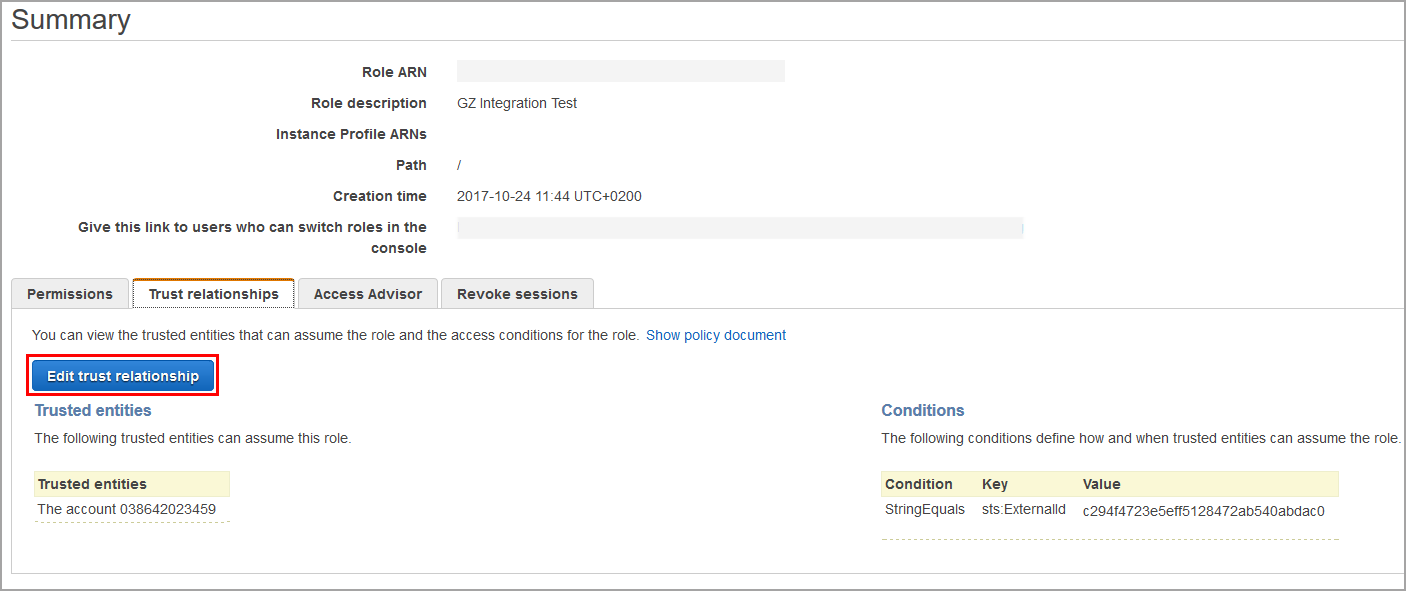
- Enter the new External ID in the
sts:ExternalIDfield.
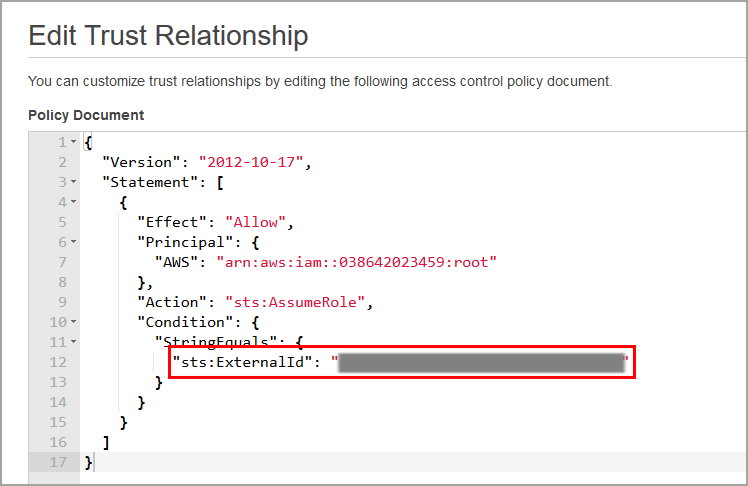
- Click Update Trust Policy.
- Go back to the Amazon EC2 Integration Settings window in GravityZone Control Center. The time for the changes to propagate to AWS may vary. Wait for about 1 minute, then click Save.
Error Messages
Certain error messages will inform you when something goes wrong with your Amazon EC2 integration:
- Could not save the changes. Either the provided External ID is incorrect, or the AWS role has propagated in all regions yet.
This error appears when clicking Save in the Amazon EC2 Integration Settings window, in the following situations:
- The Amazon EC2 policy for your role did not propagate to any AWS region. Wait for a few seconds and click again Save.
- You have introduced an incorrect External ID when creating or updating your role in the AWS console.
- Amazon EC2 policy was not applied on all regions. Please wait a few seconds and try again.
This error appears when clicking Save in the Amazon EC2 Integration Settings window and the Amazon EC2 policy has propagated to some, but not to all AWS regions. Wait a little bit more and click Save again.
- Not authorized to perform this operation. Make sure the AmazonEC2ReadOnlyAccess is attached to the user/role.
This error appears when clicking Save in the Amazon EC2 Integration Settings window, if the AmazonEC2ReadOnly policy is not attached to the role. To solve this issue, log in to the AWS console, go to Roles > [your role] > Permissions > Attach policy and select the missing policy.
- Invalid ARN for the specified role.
This error appears when clicking Save in the Amazon EC2 Integration Settings window after providing an invalid ARN. Verify the ARN and click Save again.
- Unknown communication error.
This error appears if a communication error has been encountered when clicking Save in the Amazon EC2 Integration Settings window. Wait a few seconds and click Save again.
- Invalid Amazon User Credentials.
You receive this notification by email when:
- The integration policy from the AWS console (AmazonEC2ReadOnlyAccess) has been detached from your IAM role.
- You have generated a new External ID without modifying your IAM role or your role has a different External ID from the one existing in GravityZone Control Center.
- Your IAM role has been deleted from AWS for an existing Amazon EC2 integration.
This error message is sent one time a day, after:
- Manual synchronization, when clicking the Synchronize with Amazon EC2 button in Control Center > Network.
- Automatic synchronization of GravityZone with AWS, which occurrs at every 15 minutes.
Removing the Integration
If you do not want to manage the security of your Amazon EC2 instances with Bitdefender anymore, you can delete the integration from Control Center. For details, refer to this KB article.
 Australia:
(+61) 1300 888 829, (+61) 385 956 732
Australia:
(+61) 1300 888 829, (+61) 385 956 732 Canada:
(+1) 647 977 5827, (+1) 647 367 1846
Canada:
(+1) 647 977 5827, (+1) 647 367 1846  Deutschland:
(+49) 2304 9993004
Deutschland:
(+49) 2304 9993004  España:
(+34) 937 370 223
España:
(+34) 937 370 223
 France:
+33(0)184070660
France:
+33(0)184070660  New
Zealand: (+64) 0800 451 786
New
Zealand: (+64) 0800 451 786  Osterreich:
(+49) 2304 9993004
Osterreich:
(+49) 2304 9993004  România:
(+40) 21 264 1777, (+40) 374 303 077
România:
(+40) 21 264 1777, (+40) 374 303 077  Schweiz:
(+49) 2304 9993004
Schweiz:
(+49) 2304 9993004  United
States: (+1) 954 414 9621, (+1) 954
281 4669
United
States: (+1) 954 414 9621, (+1) 954
281 4669  United
Kingdom: (+44) 2036 080 456, (+44) 2080 991 687
United
Kingdom: (+44) 2036 080 456, (+44) 2080 991 687  WorldWide: (+40) 31 620 4235,
(+40) 374 303 035
WorldWide: (+40) 31 620 4235,
(+40) 374 303 035