Deploy Sandbox Analyzer Virtual Appliance (Security Appliance Sandbox)
To deploy the Sandbox Analyzer Virtual Appliance:
Log in to the GravityZone Control Center.
Go to the Network > Packages page.
Select Sandbox Analyzer check box from table.
Click the Download button at the upper-left side of the page. Select the Security Appliance (ESXi standalone) option.
Use your virtualization management tool (for example, vSphere Client) to import the downloaded OVA file into your virtual environment.
Note
When deploying the OVA file, configure the networks as follows:
Bitdefender Network - this is the network where other Bitdefender components reside. This is the network interface card (NIC) that communicates with the GravityZone environment.
Private Detonation Network - this network will be used by Sandbox Analyzer for internal communication. This network must be isolated from any other network segments.
Internet Access Network - Sandbox Analyzer will use this network for obtaining the latest updates.
Power on the appliance.
From your virtualization management tool, access the console interface of the Sandbox Analyzer Virtual Appliance.
When prompted for credentials, use
rootfor username andsvefor password.Access the configuration menu by running the following command:
In the Sandbox configuration menu, make the following settings:
Network configuration. Select this option to configure the management NIC. Sandbox Analyzer will use this network interface to communicate with GravityZone.
The IP address can be manually specified or automatically through DHCP.
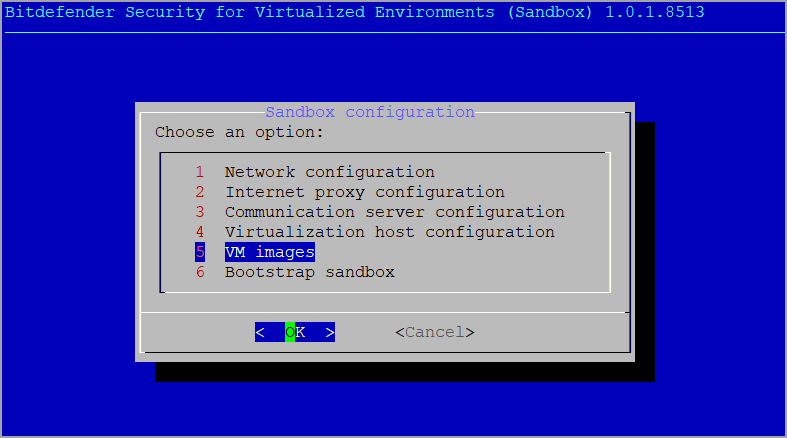
Internet proxy configuration. For installation to succeed, Sandbox Analyzer requires internet connection. If the case, you can configure Sandbox Analyzer to use a proxy server by specifying these details:
Host - IP or FQDN of the proxy server. Use the following syntax:
http://<IP/Hostname>:<Port>.User and password - you need to type in the password twice.
Domain - the Active Directory domain, if the case.
Communication server configuration. Specify either the IP address or the hostname of the appliance running the Communication Server role.
Use the following syntax:
http://<IP/Hostname>:<Port>. The default port is8443.Note
As soon as IP address or hostname is specified, and configuration is saved, the Sandbox Analyzer instance will become visible in GravityZone Control Center, in the Sandbox Analyzer > Infrastructure page.
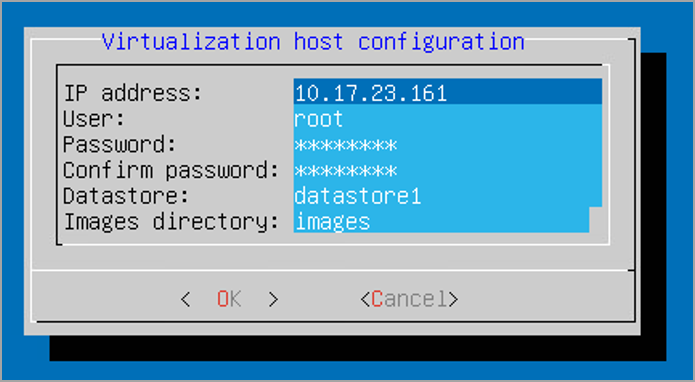
Virtualized host configuration. Sandbox Analyzer uses ESXi server to provision the malware analysis infrastructure. Using Virtualized host configuration, you connect the Sandbox Analyzer appliance to the ESXi host by providing the following information:
The ESXi server IP address.
Root credentials for accessing the ESXi host.
Datastore dedicated to Sandbox Analyzer.
Type in the datastore name as displayed by ESXi.
Name of the folder used on datastore for storing virtual machines images.
If this folder does not exist, you must create it on the datastore before saving the Sandbox Analyzer configuration.
VM Images. To build detonation virtual machines for Sandbox Analyzer, you need to copy the VMDK files containing the desired images into the Images folder specified in the the Virtualized host configuration menu. For each image, you can do in the VM Images menu the following settings:
In the Image configuration menu, specify the image name (as it will be displayed in GravityZone Control Center) and the operating system.
Note
The folder containing the VM images is periodically scanned and new entries are reported to GravityZone. These entries are visible in Control Center, in the Sandbox Analyzer > Infrastructure > Image Management page. For details, refer to this topic.
In certain situations, when using Sandbox Analyzer, you may encounter issues with the detonation virtual machines. To address these issues, you need to disable the anti-fingerprinting option. For details, refer to Anti-fingerprinting Techniques.
In the DMZ hosts menu, you can whitelist the hostnames that third-party services and components embedded in the virtual machines require to communicate with Sandbox Manager. For details, refer to DMZ Hosts
In the Cleanup menu, you can remove VM images that you do not need anymore.
Bootstrap sandbox. Once you have added the Sandbox Analyzer configuration details, proceed with the installation by selecting this option. The status of the installation will be reflected in GravityZone Control Center, in the Sandbox Analyzer > Infrastructure page.
After installation, the Sandbox Analyzer virtual appliance will be displayed as Security Appliance Sandbox in the Configuration > Update > Components section of GravityZone Control Center.
During installation, you may encounter errors sometimes. To help you overcome them, refer to: Installation error codes for Sandbox Analyzer On-premises.
Anti-fingerprinting techniques
By default, during the image build process, Sandbox Analyzer will enable various anti-fingerprinting techniques. Certain types of malware are capable to determine whether they are running themselves in a sandbox environment and, if so, they will not activate their malicious routines.
The purpose of the anti-fingerprinting techniques is to simulate various conditions with the purpose of mimicking a real world environment. Due to a virtual eliminated combination of deployed software and environment configuration, a combination that cannot be foreseen in advance or controlled, it is possible that certain techniques will not be compatible with the software installed in the golden image. You can recognize such rare situations by the following symptoms:
Errors during the image build process.
Errors when trying to run the software inside the image.
Failure messages returned when detonating samples.
Licensed software no longer working due to invalid license keys.
A quick remedy to such rare occurrences consists in rebuilding the image with the anti-fingerprinting techniques disabled. To do so, follow the steps below:
Log in to GravityZone Control Center and delete the image.
Log in to Sandbox Analyzer appliance and launch the Sandbox Analyzer appliance console by running the following command:
/opt/bitdefender/bin/sandbox-setup
Go to VM Images > Image Configuration.
Select the image that is causing problems.
Go to Anti-fingerprinting option.
Deselect the corresponding check box to disable anti-fingerprinting techniques.
For the list of errors you may encounter while building VM images, refer to Error codes for image management in Sandbox Analyzer.
Additionally, refer to these topics:
DMZ hosts
During the image building process, a virtual infrastructure will be created to facilitate communication between the Sandbox Manager and the virtual machines. From the network perspective, this translates into an isolated network environment that will contain all the potential communication that a detonated sample might create.
The DMZ servers menu allows to whitelist hostnames that 3rd party services and components embedded in the virtual machines require to communicate with, in order to function properly.
An example for this situation would be the KMS licensing servers used by Windows licensing, if a Volume license is applied on the supplied virtual machines.
What to do next
After installing the Sandbox Analyzer Virtual Appliance, you can take these actions:
Manage the Sandbox Analyzer On-premises infrastructure, including building VM images
Submit samples manually to local instances, in addition to Cloud Sandbox
Resubmit samples, if the case, without re-uploading the actual files
View detailed HTML reports and take other actions based on the results