


Configure GravityZone Cloud single sign-on using a 3rd party identity provider
GravityZone Cloud supports single sign-on (SSO) with 3rd party identity providers that use SAML 2.0, such as AD FS, Okta and Azure AD. This article describes how to configure GravityZone Cloud single sign-on using a 3rd party identity provider.
- Overview
- Prerequisites and requirements
- Configuring GravityZone SSO
- Testing GravityZone SSO
- Disabling GravityZone SSO
| Important:
GravityZone SSO has been officially tested with AD FS, Okta and Azure AD, but it may to work with other identity providers using SAML 2.0. This article includes links to dedicated procedures for configuring AD FS, Okta and Azure AD, as well as general information about configuring other identity providers. If GravityZone SSO fails with another identity provider than those officially supported, this may happen because of that specific identity provider. Contact the Bitdefender Technical Support Team for possible recommendations, but this is not guaranteed for all identity providers. |
Overview
GravityZone single sign-on allows users to log in to Control Center by authenticating with an identity provider, as a more simple and secure method than GravityZone credentials, as users do not need to remember or renew their passwords.
GravityZone supports service provider (SP) initiated single sign-on, which implies the following user authentication flow:
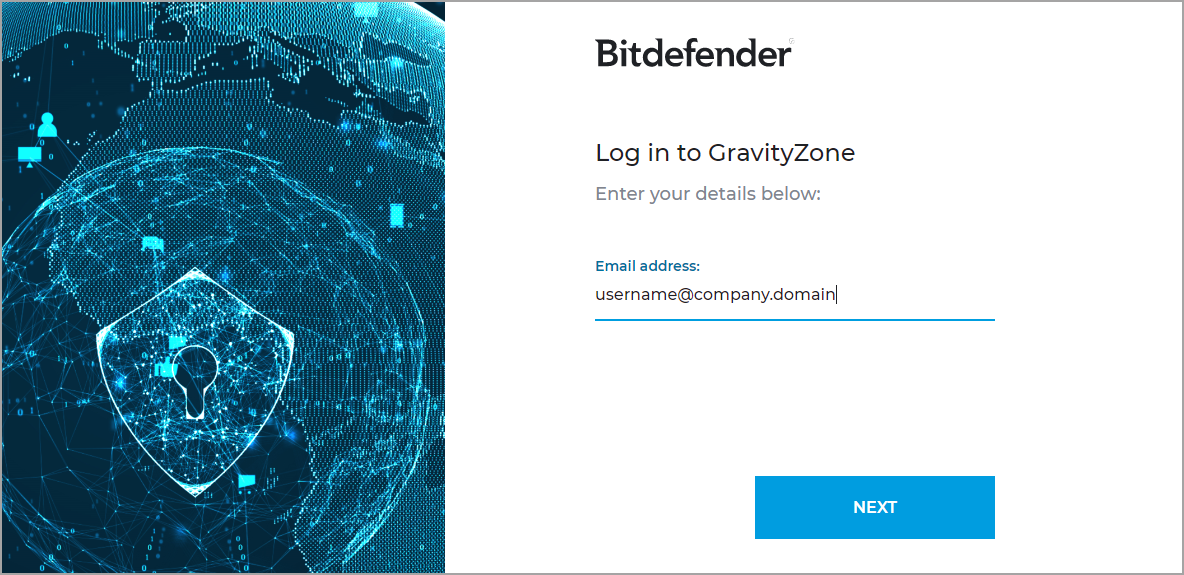
- Users go to https://gravityzone.bitdefender.com/, enter their emails, and click Next.
- GravityZone creates a SAML request and forwards the request and the users to the identity provider, asking for authentication.
- Users authenticate with the identity provider.
- After authentication, the identity provider sends an authentication response in the form of an XML document signed with an X.509 certificate and sends the information to GravityZone. The identity provider redirects users back to GravityZone.
- GravityZone retrieves the response and validates it with the certificate fingerprint, allowing the users to log in to Control Center with no other interaction from them.
As long as the users have an active session with the identity provider, they continue to automatically log in to GravityZone Control Center.
Prerequisites and requirements
To enable GravityZone SSO, the following conditions are required:
- You have a GravityZone Cloud administrator account to manage users, your company and other companies.
- You have an account with an identity provider (AD FS, Okta, Azure AD, etc.) to configure single sign-on.
- GravityZone users have accounts with their identity providers with the same email addresses.
Important:
|
Configuring GravityZone SSO
To enable GravityZone single sign-on, you must do the following:
- Configure the identity provider to use GravityZone as service provider.
- Enable SSO in GravityZone. This step involves two stages:
- Enable SSO for your company or for companies under your management.
- Change the authentication method for GravityZone users, one by one.

Note:
You must enable SSO for a company before changing the authentication method for the users under that company. Please remember that you cannot enable SSO for your own GravityZone account.
1. Configuring the identity provider
Configurating single sign-on may vary from one identity provider to another. However, identity providers require almost the same elements to integrate with GravityZone:
- Single Sign-on URL – the location where the SAML assertion is sent with a HTTP POST. Also known as Assertion Consumer Service (ACS) URL. For GravityZone, the single sign-on URL is https://gravityzone.bitdefender.com/sp/login.
- Service Provider Entity ID – The application unique identifier that is the intended audience of the SAML assertion. Also known as Audience URL. The Entity ID for GravityZone is https://gravityzone.bitdefender.com/sp.
- Name ID format – refers to the format supported by the identity provider. Service and identity providers communicate with each other using a name identifier related to a user. For GravityZone, the name ID format is emailAddress.
- Single Logout URL – the location where the logout response is sent. For GravityZone, the single logout URL is https://gravityzone.bitdefender.com/sp/logout.
- Service Provider Issuer – this is usually the Entity ID and the service provider use this information for verification. For GravityZone, the single sign-on URL is https://gravityzone.bitdefender.com/sp/login.
You may find these elements in the GravityZone metadata URL document: https://gravityzone.bitdefender.com/sp/metadata.xml.
For your company, the GravityZone metadata URL is displayed in the Configuration > Authetication Settings page from GravityZone Control Center.
For a company under your management, the GravityZone metadata URL is displayed in the company details from the Companies page.
For details on how to configure certain identity providers, refer to this articles:
- Configure GravityZone Cloud single sign-on with AD FS
- Configure GravityZone Cloud single sign-on with Okta
- Configure GravityZone Cloud single sign-on with Azure AD
2. Enabling SSO in GravityZone
After configuring the identity provider, go to GravityZone Control Center to enable SSO for companies and users. Only users under a company with SSO enabled have the option to log in with an identity provider.
1. Enabling SSO for companies
This is how you enable SSO for your company:
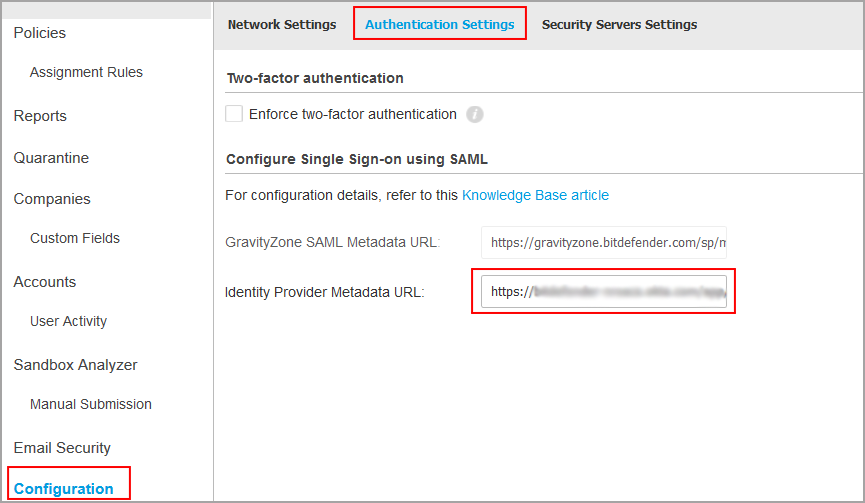
- Go to Configuration > Authentication Settings page.
- Under Cofigure Single Sign-on using SAML, enter the identity provider metadata URL in the corresponding field. The other field, reserved for the GravityZone metadata URL, is non-editable.
- Click Save.
This is how you enable SSO for a company under your management:
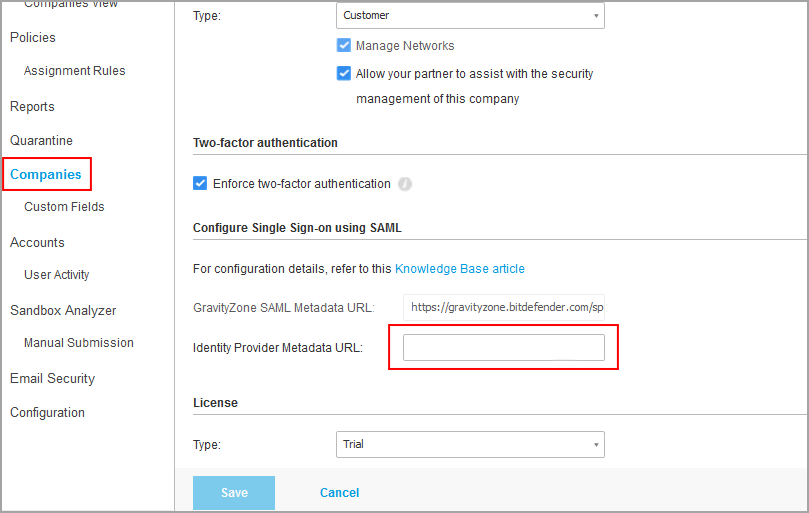
- Go to the Companies page.
- In the table, click the company’s name.
- Under Configure Single Sign-on using SAML, enter the identity provider metadata URL in the corresponding field. The other field, reserved for the GravityZone metadata URL, is non-editable.
- Click Save.
2. Changing the authentication method for users
After enabling SSO for a company, GravityZone user accounts under that company become available for changing their authentication method.
You can change the authentication method for users one by one, as follows:
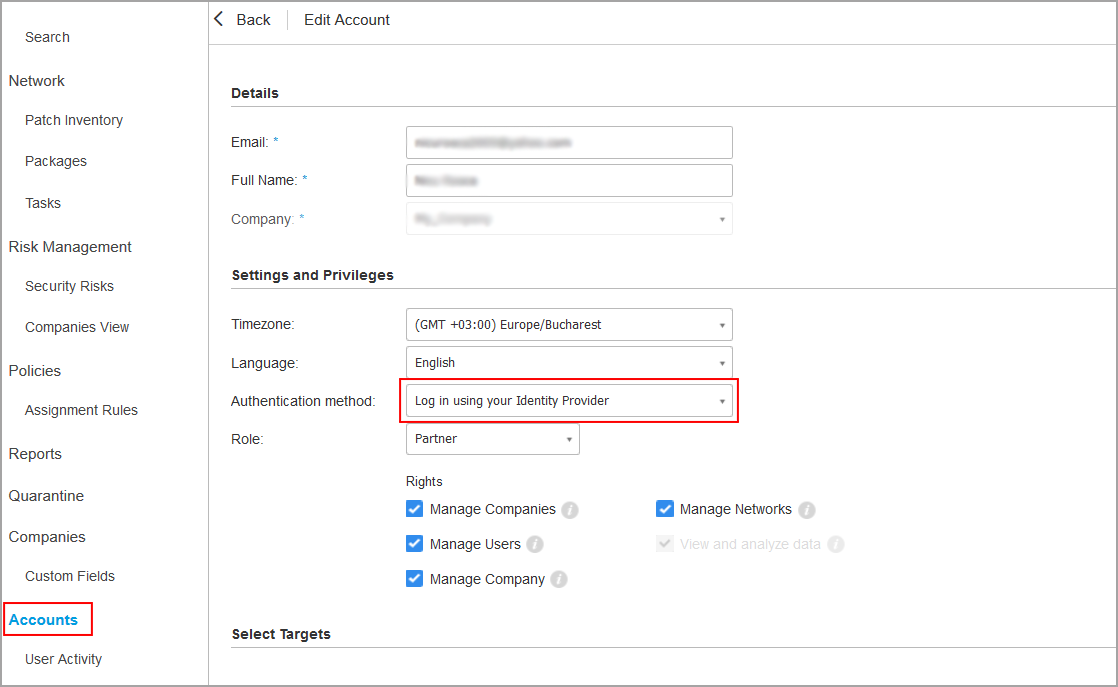
- Go to the Accounts page.
- In the table, click the user’s name.
- Under Settings and Privileges, go to Authentication method and select Login using your Identity Provider.
- Click Save.
You can enable SSO for many users as you want, but not for your own administrator account.
| Note: If the configuration page of a GravityZone user account does not display the Settings and Privileges section, then probably the company has not SSO enabled. |
Testing GravityZone SSO
After configuring both the identity provider and GravityZone, you can test single sign-on as follows:
- Log out from GravityZone.
- Log out from your identity provider (AD FS, Azure AD, Okta, etc.).
- Go to https://gravityzone.bitdefender.com/.
- Enter a valid email address created for testing (other than the one of your GravityZone administrator account).
- Click Next.
You should be redirected to the identity provider's autenthication page.
- Authenticate with your identity provider.
You should be redirected back to GravityZone and, in a few moments, you should automatically log in to Control Center.
Disabling GravityZone SSO
To disable single sign-on for your company or for a company under your management:
- Delete the identity provider metadata URL from the configuration page of that company.
- Click Save and confirm the action.
After disabling single sign-on for a company, users will automatically switch to log in with GravityZone credentials.
Users can obtain new passwords by clicking the Forgot password? link on the Control Center login page and following the instructions.
To re-enable GravityZone SSO for a company, enter again the identity provider in the configuration page and click Save.
After re-enabling SSO, users under that company will continue to log in to Control Center with GravityZone credentials. You have to manually configure each account, one by one, to log in with the identity provider again.
 Australia:
(+61) 1300 888 829, (+61) 385 956 732
Australia:
(+61) 1300 888 829, (+61) 385 956 732 Canada:
(+1) 647 977 5827, (+1) 647 367 1846
Canada:
(+1) 647 977 5827, (+1) 647 367 1846  Deutschland:
(+49) 2304 9993004
Deutschland:
(+49) 2304 9993004  España:
(+34) 937 370 223
España:
(+34) 937 370 223
 France:
+33(0)184070660
France:
+33(0)184070660  New
Zealand: (+64) 0800 451 786
New
Zealand: (+64) 0800 451 786  Osterreich:
(+49) 2304 9993004
Osterreich:
(+49) 2304 9993004  România:
(+40) 21 264 1777, (+40) 374 303 077
România:
(+40) 21 264 1777, (+40) 374 303 077  Schweiz:
(+49) 2304 9993004
Schweiz:
(+49) 2304 9993004  United
States: (+1) 954 414 9621, (+1) 954
281 4669
United
States: (+1) 954 414 9621, (+1) 954
281 4669  United
Kingdom: (+44) 2036 080 456, (+44) 2080 991 687
United
Kingdom: (+44) 2036 080 456, (+44) 2080 991 687  WorldWide: (+40) 31 620 4235,
(+40) 374 303 035
WorldWide: (+40) 31 620 4235,
(+40) 374 303 035