


How to manually deploy Bitdefender Security Server in Nutanix Prism
GravityZone allows you to integrate Control Center with Nutanix Prism Element for high-class protection of your virtualization platform. You are able to integrate one or more Nutanix Prism Element clusters, either they are registered or unregistered to Nutanix Prism Central.
This article includes:
- Nutanix Prism Element integration overview
- How to upload the Security Server image in Nutanix Prism
- How to configure Security Server in Nutanix Prism
Nutanix Prism Element integration overview
To protect a Nutanix Prism Element cluster, you have to deploy a Bitdefender Security Server on each host. You can do this by running a remote installation task in GravityZone Control Center. However, the installation task may fail when the Nutanix Prism Element cluster is registered to Prism Central or because of another reason.
When Nutanix Prism Element is registered to Prism Central, GravityZone is unable to automatically upload the Security Server in Nutanix because of certain user restrictions. Therefore, you need to:
- Upload the Security Server image in Nutanix Prism Central.
- Run again the installation task in GravityZone Control Center.
When Nutanix Prism Element is not registered to Prism Central, but the remote installation task still fails, you need to:
- Run again the installation task in GravityZone Control Center.
- If the case, upload and configure Security Server in Nutanix Prism Element.
Important:
|
How to upload the Security Server image in Nutanix Prism
- Requirements
- Uploading Security Server in Nutanix Prism Central
- Uploading Security Server in Nutanix Prism Element
Requirements
Before starting Security Server upload and configuration in Nutanix Prism, you must have at hand:
- Nutanix Prism credentials.
- Bitdefender Security Server image in VMDK format. You can download it from Network > Packages in GravityZone Control Center.
Uploading Security Server in Nutanix Prism Central
You need to manually upload the Security Server image in Nutanix Prism Central when the Nutanix Prism Element cluster is registered to Prism Central. Follow these steps:
Important:
|
- Log in to Nutanix Prism Central.
- Go to Explore > Images.
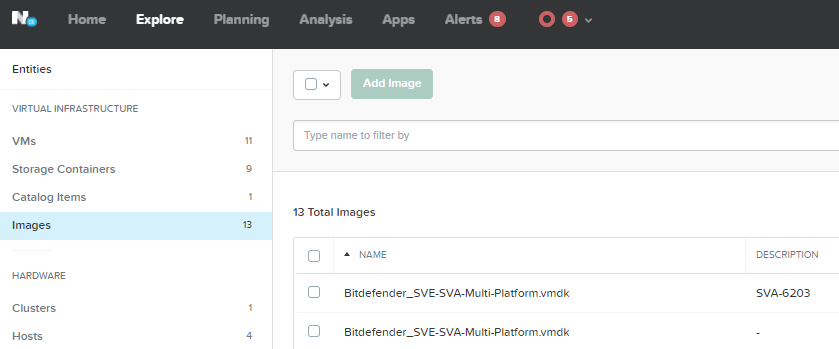
- Click Add Image.
- Make sure you have the Image File radio button selected and click Add File to select the Bitdefender image from where it is stored.
- Check the image details:
- Under Image Name, keep the file original name:
Bitdefender_SVE-SVA-Multi-Platform.vmdk. Otherwise, the Security Server installation will fail. - Under Image Type, select Disk.
- Optionally, add an image description.
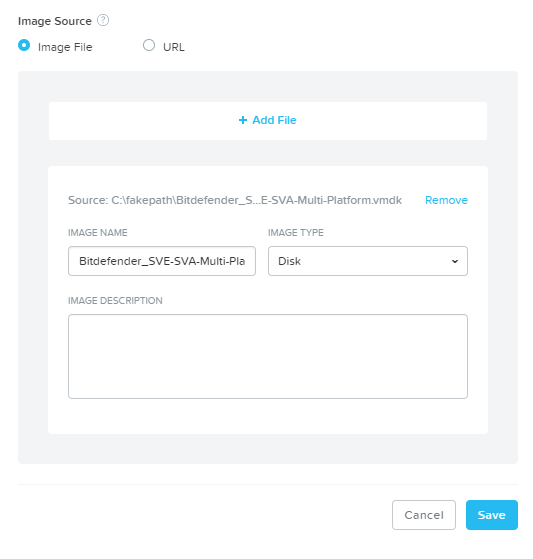
- Under Image Name, keep the file original name:
- Click Save. The Security Server image upload begins and it can take several minutes. You can view the progress in Tasks.
Uploading Security Server in Nutanix Prism Element
This is how you manually upload the Security Server when Nutanix Prism Element in not registered to Prism Central:
- Log in to Nutanix Prism Element.
- Go to Settings > Image Configuration.
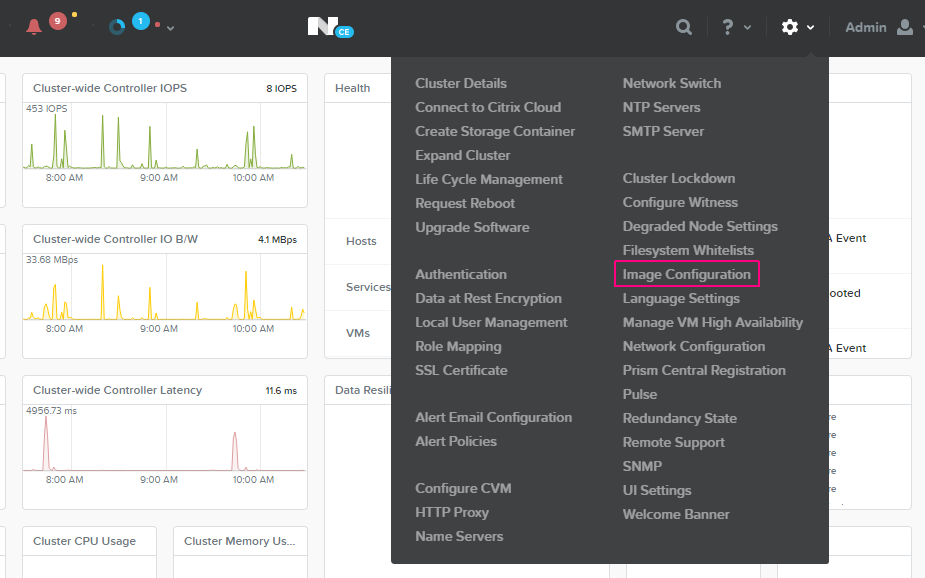
- Click Upload Image. A new window appears.
- Fill in the details:
- Name.
- Annotation.
- Select the image type: DISK.
- Select the preferred storage container.
- Click Upload a file, then click Choose File to select the Security Server image from where it is stored.
- Click Save.
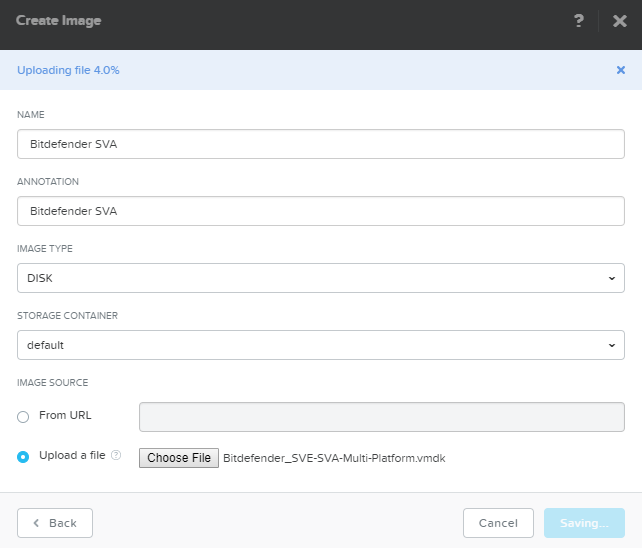
The Security Server image upload begins and it can take several minutes. You can view the progress in Tasks.
Wait for the image to be both uploaded and updated.
How to configure Security Server in Nutanix Prism
Once you have the Security Server image uploaded in Nutanix Prism, you can either:
- Run a remote installation task in GravityZone Control Center. Security Server will be automatically configured.
- Manually configure Security Server in Nutanix Prism. That means you have to create a Security Server virtual machine, power it on and configure the Communication Server address in the Security Server console.
To configure a Security Server virtual machine you must follow these steps in Prism Element or in Prism Central:
- Go to the virtual machines list and click Create VM.
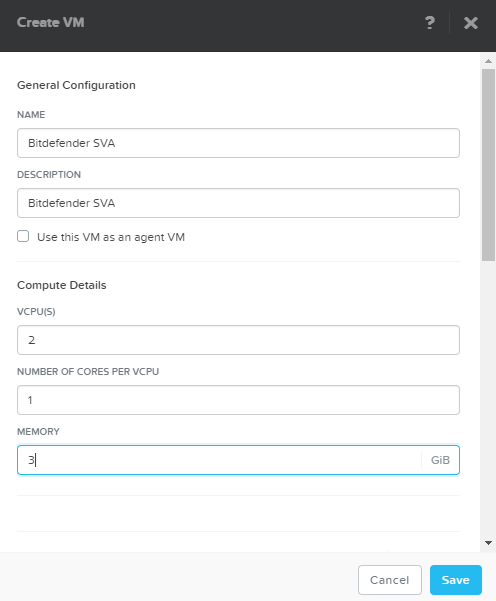
- Fill in the required details:
- Under General Configuration, enter a name and, optionally, a description.
- Under Compute Details, choose 2 VCPUs, 1 core per VCPU and 3 GB of memory.
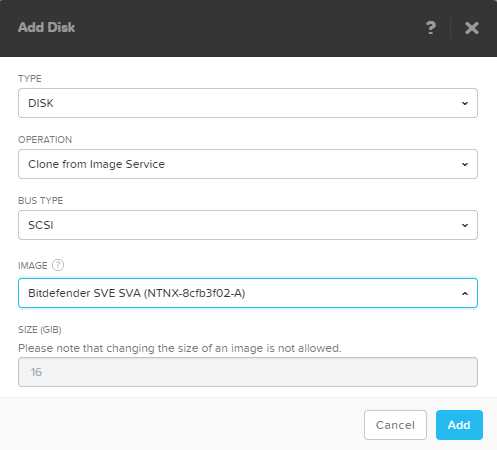
- Under Disks, click "X" to remove the default CD-ROM disk, confirm the action and click Add New Disk. Configure the disk as follows:
- Type: Disk.
- Operation: Clone from Image Service.
- Bus Type: SCSI.
- Image: Select the Security Server image you have uploaded.
- Click Add.
- Under Network Adapters (NIC):
- Click Add New NIC.
- Choose the preferred network.
- Click Add.
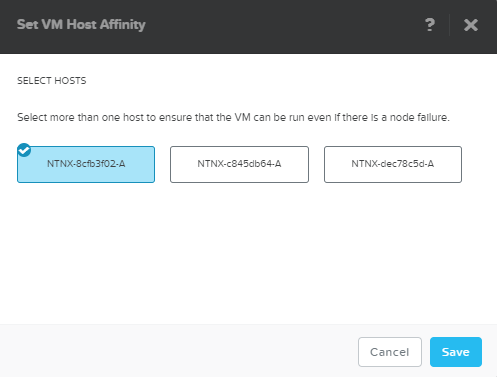
- Under VM Host Affinity:
- Click Set Affinity.
- Select one of the hosts.
- Click Save.
- Click Save. The virtual machine is created with the VM create with customize label.
- Go to virtual machines list.
- Select the Security Server virtual machine.
- Click Power on.
- Click Launch console and log in to Security Server by using the default credentials:
- User name:
root - Password:
sve
- User name:
- Run the
sva-setupcommand. You will access the appliance configuration interface.
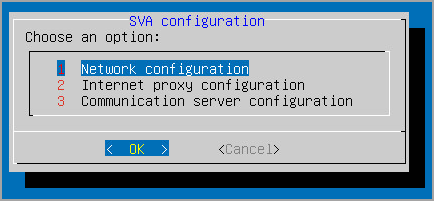
To navigate through menus and options, use the
Taband arrow keys. To select a specific option, pressEnter. - Go to Communication Server configuration.
- Enter the address of the Communication Server, including the port number 8443, using the following format
https://Communication-Server-IP:8443Alternatively, you can use the Communication Server hostname instead of the IP address.
- Select OK to save the changes.
 Australia:
(+61) 1300 888 829, (+61) 385 956 732
Australia:
(+61) 1300 888 829, (+61) 385 956 732 Canada:
(+1) 647 977 5827, (+1) 647 367 1846
Canada:
(+1) 647 977 5827, (+1) 647 367 1846  Deutschland:
(+49) 2304 9993004
Deutschland:
(+49) 2304 9993004  España:
(+34) 937 370 223
España:
(+34) 937 370 223
 France:
+33(0)184070660
France:
+33(0)184070660  New
Zealand: (+64) 0800 451 786
New
Zealand: (+64) 0800 451 786  Osterreich:
(+49) 2304 9993004
Osterreich:
(+49) 2304 9993004  România:
(+40) 21 264 1777, (+40) 374 303 077
România:
(+40) 21 264 1777, (+40) 374 303 077  Schweiz:
(+49) 2304 9993004
Schweiz:
(+49) 2304 9993004  United
States: (+1) 954 414 9621, (+1) 954
281 4669
United
States: (+1) 954 414 9621, (+1) 954
281 4669  United
Kingdom: (+44) 2036 080 456, (+44) 2080 991 687
United
Kingdom: (+44) 2036 080 456, (+44) 2080 991 687  WorldWide: (+40) 31 620 4235,
(+40) 374 303 035
WorldWide: (+40) 31 620 4235,
(+40) 374 303 035