


How to configure GravityZone CLI
Bitdefender GravityZone provides full visibility into organizations' overall security posture, global security threats, and control over its security services that protect virtual or physical desktops, servers and mobile devices. All Bitdefender's Enterprise Security solutions are managed within the GravityZone through a single console, Control Center, that provides control, reporting, and alerting services for various roles within the organization.
This article provides more details about GravityZone CLI (Command Line Interface) configuration.
GravityZone appliance comes with a basic configuration interface, available from the management tool used to manage the virtualized environment where you have deployed the appliance. To configure a new GravityZone virtual appliance CLI after it was imported on a virtualized hosts running on ESXi, XenServer, Hyper-V or KVM, follow the next steps:
-
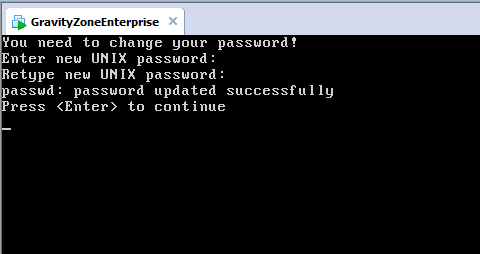
Upon the first boot of a new virtual machine, you are required to configure the password for the built-in bdadmin system administrator account:
-
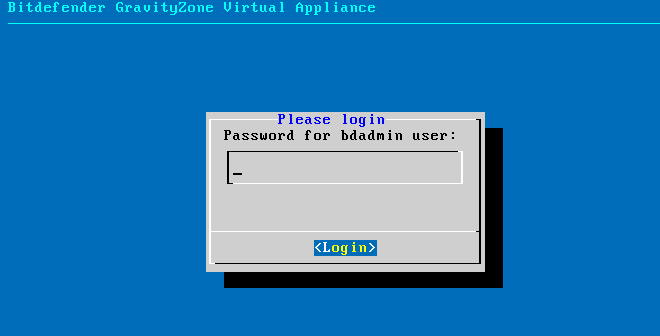
Login to the CLI menu using the bdadmin account password configured above.
-
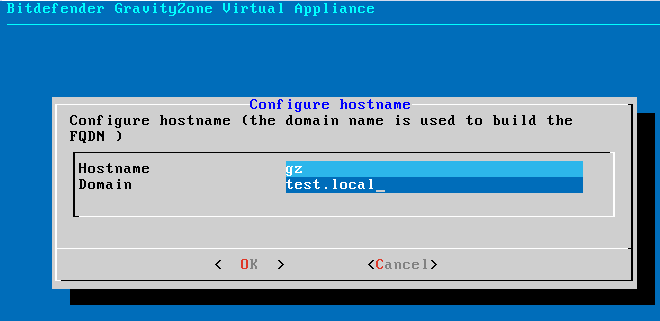
From the Appliance Options menu, configure the following options:

-
Configure Hostname Settings
-
Configure Network Settings
The appliance can be configured to automatically receive the network settings from a DHCP server or can have the network settings configured manually. If the DHCP configurations are used, make sure the IP address is reserved and will not be changed upon renewal.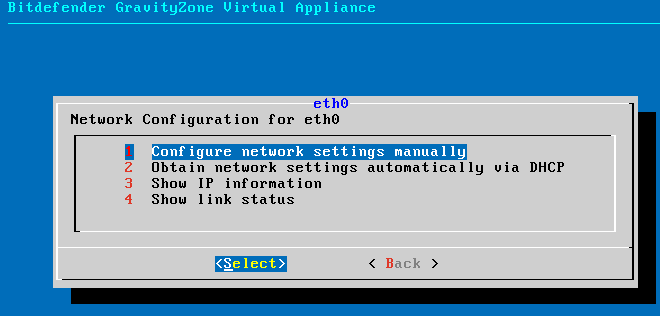
-
Configure Proxy Settings
Each GravityZone instance requires Internet connectivity during the initial configuration. If the Internet access is routed through a proxy server, configure its address using the following syntax:-
If the proxy server does not require authentication:
http(s)://‹IP/hostname›:‹port› -
If the proxy server requires authentication:
http(s)://‹username›:‹password›@‹IP/hostname›:‹port›

-
If the proxy server does not require authentication:
-
Configure Language
This setting controls the CLI language and can be configured to English, French, Spanish or German.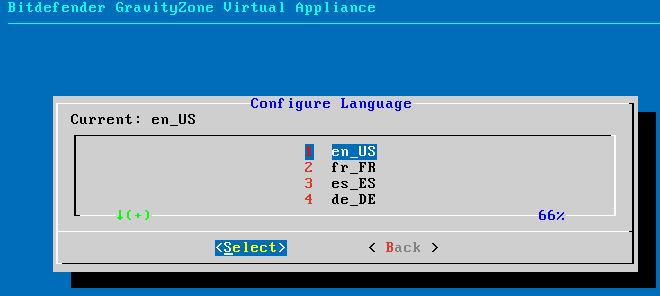
-
Install / Uninstall Roles
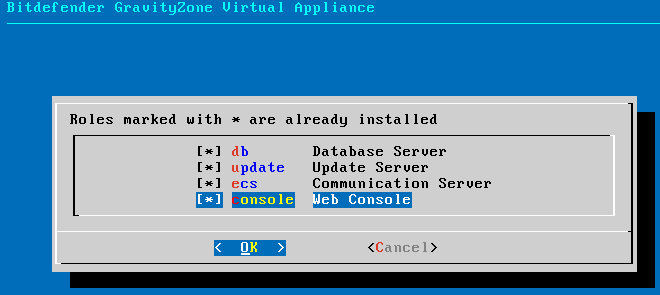
GravityZone appliance can run one, several or all of the following roles:- Database Server
- Update Server
- Web Console
- Communication Server
- Choose option 5 Advanced Settings -> Install / Uninstall Roles and then option 1 Add or Remove Roles.
-
Select Database Server role by pressing space and then start the role installation.
After the Database Server role is installed, we can move to the next step and install the Web Console, Communication Server and Update Server roles.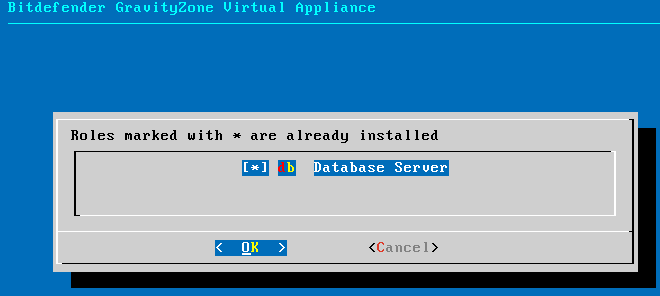
-
Go back to the Appliance Options menu and select option 5 Advanced Settings -> Install / Uninstall Roles then select Web Console, Communication Server and Update server by pressing SPACE and start the role installation.
-
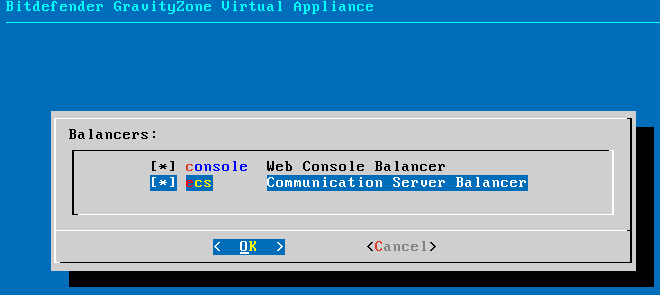
Configure Role Balancers
To ensure reliability and scalability, you can install multiple instances of specific roles (Communication Server, Web Console). Each role instance is installed on a different appliance. All instances of a specific role must be connected to the other roles via a role balancer. The GravityZone appliance includes built-in balancers that you can install and use. If you already have balancing software or hardware within your network, you can choose to use them instead of the built-in balancers. Using this option you will be able to define the external balancer addresses and ports or install a role balancer appliance for web console and communication server role.
Built-in role balancers cannot be installed together with roles on a GravityZone appliance.
To configure GravityZone built-in load balancer role, follow the next steps:- Create a new GravityZone instance and login to the Appliance Options menu.
- Choose option 5 Advanced Settings -> Connect to Existing Database and enter the address of the database server. Use the following syntax: ‹IP/Hostname›:‹Port›.
-
Go back to the Appliance Options menu, select option 5 Advanced Settings -> 6 Configure Role Balancers and then option 2 Use the built-in balancers. On the next window select the Web Console Balancer and Communication Server Balancer options.
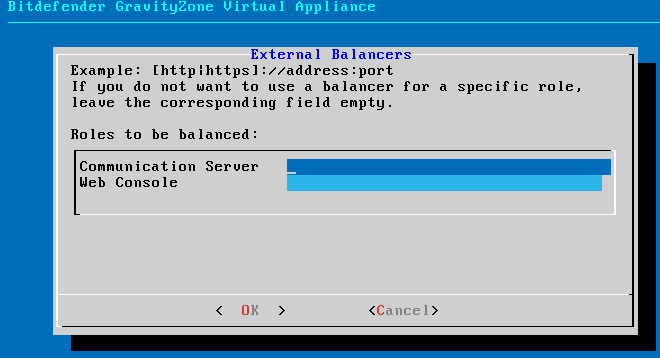
To configure GravityZone to use an existing (external) load balancer (LB), you need to configure that load balancer to execute TCP load balancing for two ports on the public IP address or domain name assigned to it. On those ports the load balancer receives requests designated for the Web Console roles and Communication Server roles, forwarding them internally to those servers.
For example:-
External Web Server address on LB:
- https://ws.domain.com:4444 -
Internal Web Server addresses (as configured on the respective GZ instances):
- ws1.domain.local:443
- ws2.domain.local:443 -
External Communication Server address on LB:
- https://cs.domain.com:8888 -
Internal Communication Server addresses (as configured on the respective GZ instances):
- ecs1.domain.local:8443
- ecs2.domain.local:8443
After the external load balancer is configured, follow the next steps:- Select option 6 Configure Role Balancers and then option 1 Use external balancers.
-
Fill in the external Web Server and Communication Server addresses configured on the external load balancer.
-
Configure Communication Server
GravityZone contains the Security for Mobile Devices module allowing the GravityZone administrator to manage the users' mobile devices. The management tasks for mobile devices are executed over the Internet and for that reason the GravityZone Communication Server has to be configured with an external network address from which it receives communication from the managed mobile devices.
To facilitate this communication, the infrastructure administrators have to configure a NAT rule on the border firewall to correlate the external address with the internal communication server address.
If the configured Communication Server load balancing address is already configured as an external address, that address can be used.
The External Communication Server address is configured in the GravityZone following the next steps:- Select option 4 MDM Communication Server -> 2 Configure MDM Server external address.
- Enter the external address.
-
Use the following syntax: https://‹IP/Domain›:‹Port›.
- If you use port forwarding, you must enter the public IP address or domain name and the port open on the gateway.
-
If you use a public address for the Communication Server, you must enter the public IP address or domain name and the Communication Server port. The default port is 8443.

-
Configure Update Server
GravityZone appliance is by default configured to update from the Internet. If you prefer, you can set your installed appliances to update from the local Bitdefender update server (the GravityZone appliance with the Update Server role installed).
To set the update server address enter the IP address or hostname of the appliance running the Update Server role. The default Update Server port is 7074.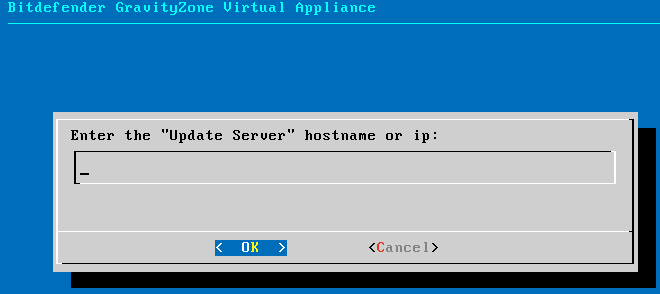
-
Configure Database Address
In a scenario with multiple GravityZone appliances, you will install the Database Server role on the first appliance and configure all other appliances to connect to the existing database instance. To configure a GravityZone appliance to connect to an existing database enter the database address. Use the following syntax:
‹IP/Hostname›:‹Port›.
Specifying the port is optional. The default port is 27017.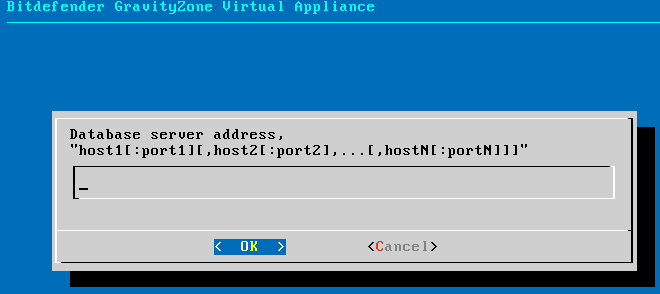
-
Configure Hostname Settings
 Australia:
(+61) 1300 888 829, (+61) 385 956 732
Australia:
(+61) 1300 888 829, (+61) 385 956 732 Canada:
(+1) 647 977 5827, (+1) 647 367 1846
Canada:
(+1) 647 977 5827, (+1) 647 367 1846  Deutschland:
(+49) 2304 9993004
Deutschland:
(+49) 2304 9993004  España:
(+34) 937 370 223
España:
(+34) 937 370 223
 France:
+33(0)184070660
France:
+33(0)184070660  New
Zealand: (+64) 0800 451 786
New
Zealand: (+64) 0800 451 786  Osterreich:
(+49) 2304 9993004
Osterreich:
(+49) 2304 9993004  România:
(+40) 21 264 1777, (+40) 374 303 077
România:
(+40) 21 264 1777, (+40) 374 303 077  Schweiz:
(+49) 2304 9993004
Schweiz:
(+49) 2304 9993004  United
States: (+1) 954 414 9621, (+1) 954
281 4669
United
States: (+1) 954 414 9621, (+1) 954
281 4669  United
Kingdom: (+44) 2036 080 456, (+44) 2080 991 687
United
Kingdom: (+44) 2036 080 456, (+44) 2080 991 687  WorldWide: (+40) 31 620 4235,
(+40) 374 303 035
WorldWide: (+40) 31 620 4235,
(+40) 374 303 035