


How to install Security Server on VMware environment with vShield Endpoint
Bitdefender GravityZone provides full visibility into organizations' overall security posture, global security threats, and control over its security services that protect virtual or physical desktops, servers and mobile devices. All Bitdefender's Enterprise Security solutions are managed within the GravityZone through a single console, Control Center, that provides control, reporting, and alerting services for various roles within the organization
Security for Virtualized Environments (SVE) is the first comprehensive security solution for virtualized datacenters. The solution protects virtualized Windows, Linux, and Solaris systems, both servers and desktops. While integrated with VMware vShield Endpoint, the unique architecture of the solution allows it to be leveraged when using any system virtualization offering.
This article explains how to install Security Server on the hosts you want to protect.
Security Server is a dedicated virtual machine that deduplicates and centralizes most of the antimalware functionality of antimalware clients, acting as a scan server.
You must install the purpose-built appliance on each host to be protected. All virtual machines on a host are automatically connected via vShield Endpoint to the Security Server instance installed on that host.
For VMware environments with vShield Endpoint, you can deploy Security Server on hosts exclusively via installation tasks.
Using Remote Installation Tasks
Control Center allows you to remotely install Security Server on visible hosts by using installation tasks.
To install Security Server remotely on one or several hosts:
- Go to the Network page.
- From the service selector in the upper-right corner of the page, select Virtual Machines.
-
Browse the VMware inventory and select the check boxes corresponding to the desired hosts or containers (vCenter Server, or datacenter). For a fast selection, you can directly select the root container (VMware Inventory). You will be able to select hosts individually from the installation wizard.
Note: You cannot select hosts from different folders.
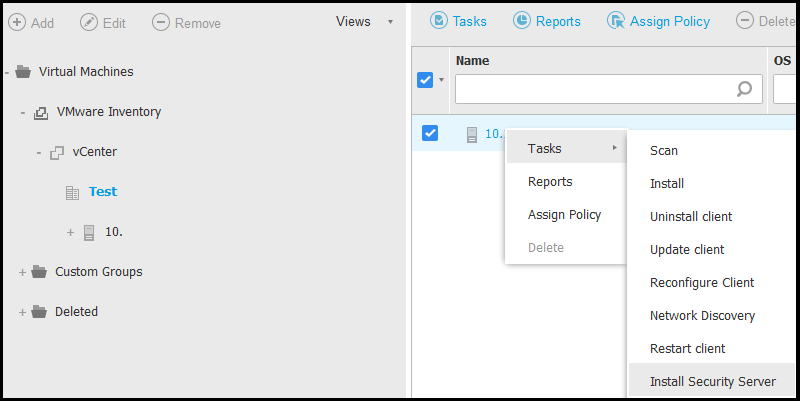
- Click the Tasks button at the right side of the table.
-
Choose Install Security Server from the menu. The Security Server Installation window is displayed.
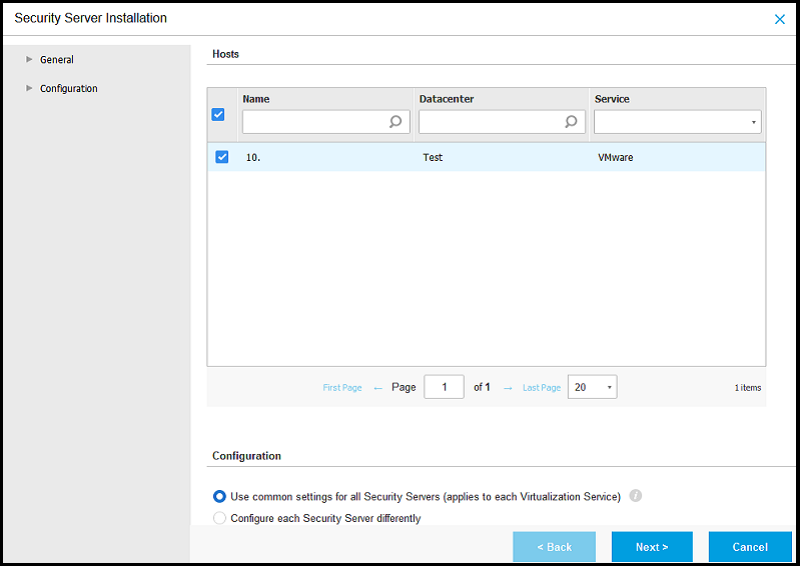
- Select the hosts on which you want to install the Security Server instances.
-
Choose the configuration settings you want to use.
When you configure each Security Server differently, repeat steps 9 to 18 for each Security Server.Important: Using common settings while deploying multiple Security Server instances simultaneously requires the hosts to share the same storage, have their IP addresses assigned by a DHCP server and be part of the same network.
- Click Next.
- Optionally, you can enter a suggestive name for the Security Server.
- Select the container in which you want to include the Security Server from the Deploy Container menu.
- Select the destination storage.
-
Choose the disk provisioning type. It is recommended to deploy the appliance using thick disk provisioning.
Important: If you use thin disk provisioning and the disk space in the datastore runs out, the Security Server will freeze and, consequently, the host will remain unprotected.
- Configure the memory and CPU resource allocation based on the VM consolidation ratio on the host. Choose Low, Medium or High to load the recommended resource allocation settings or Manual to configure resource allocation manually.
- Optionally, you can choose to set an administrative password for the Security Server console. Setting an administrative password overrides the default root password ("sve").
- Set the timezone of the appliance.
-
Select the network configuration type for the Bitdefender network. The IP address of the Security Server must not change in time, as it is used by Linux agents for communication.
If you choose DHCP, make sure to configure the DHCP server to reserve an IP address for the appliance.
If you choose Static, you must enter the IP address, subnet mask, gateway and DNS information. - Select the vShield network and enter the vShield credentials. Default label for the vShield network is vmservice-vshield-p.
- If you configure Security Servers differently, click Next to continue with the following server.
- Click Save.
 Australia:
(+61) 1300 888 829, (+61) 385 956 732
Australia:
(+61) 1300 888 829, (+61) 385 956 732 Canada:
(+1) 647 977 5827, (+1) 647 367 1846
Canada:
(+1) 647 977 5827, (+1) 647 367 1846  Deutschland:
(+49) 2304 9993004
Deutschland:
(+49) 2304 9993004  España:
(+34) 937 370 223
España:
(+34) 937 370 223
 France:
+33(0)184070660
France:
+33(0)184070660  New
Zealand: (+64) 0800 451 786
New
Zealand: (+64) 0800 451 786  Osterreich:
(+49) 2304 9993004
Osterreich:
(+49) 2304 9993004  România:
(+40) 21 264 1777, (+40) 374 303 077
România:
(+40) 21 264 1777, (+40) 374 303 077  Schweiz:
(+49) 2304 9993004
Schweiz:
(+49) 2304 9993004  United
States: (+1) 954 414 9621, (+1) 954
281 4669
United
States: (+1) 954 414 9621, (+1) 954
281 4669  United
Kingdom: (+44) 2036 080 456, (+44) 2080 991 687
United
Kingdom: (+44) 2036 080 456, (+44) 2080 991 687  WorldWide: (+40) 31 620 4235,
(+40) 374 303 035
WorldWide: (+40) 31 620 4235,
(+40) 374 303 035