How to manually remove a Fake Antivirus infection

This article is a step-by-step guide to help you manually eliminate fake antivirus infections quickly. We’ll also help you understand how fake antivirus works and how to identify it.


How to recognize a Fake Antivirus program

Rogue security software designers create legitimate looking pop-up windows that advertise security update software. Such windows might appear on your screen while you surf the web. They may appear as a “warning message” displayed on a web page, notifying the user that their system is “infected”.
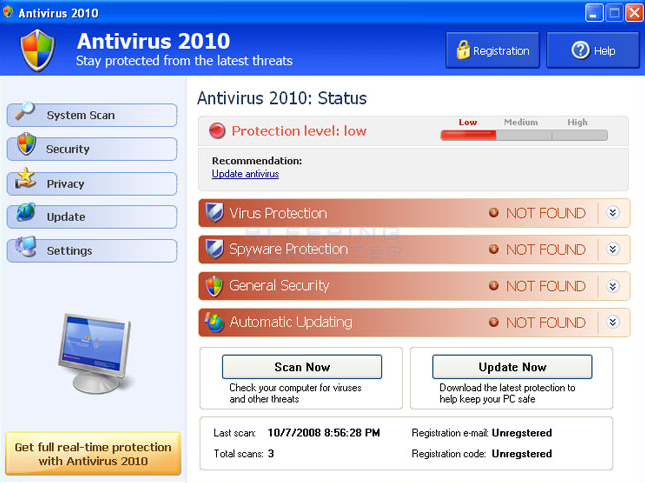
Here are some examples of Fake Antiviruses:

A fake antivirus

The “updates” or “alerts” in the pop-up windows call for you to take some sort of action, such as clicking to install the software, accept recommended updates, or remove unwanted viruses or spyware. When you click, the rogue security program downloads to your computer.

Most have a Trojan horse component, which users are misled into installing. The Trojan, which is a type of malware harming your computer from within, may be disguised as:

    • A browser plug-in or extension (typically a toolbar)
    • An image, screensaver or archive file attached to an e-mail message
    • A multimedia codec required to play a certain video clip
    • Software shared on peer-to-peer networks
    • A free online malware scanning service

All of these files will appear with an .exe extension, meaning that they are executable files. Once executed, the infection is automatically deployed.
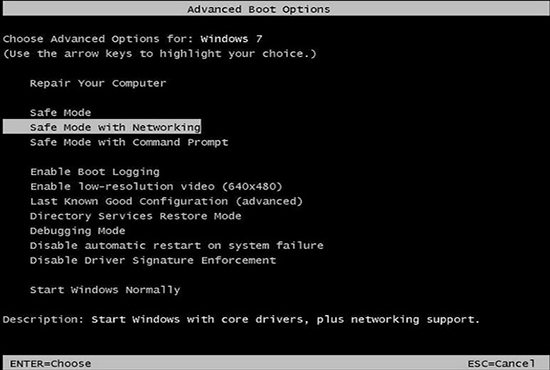
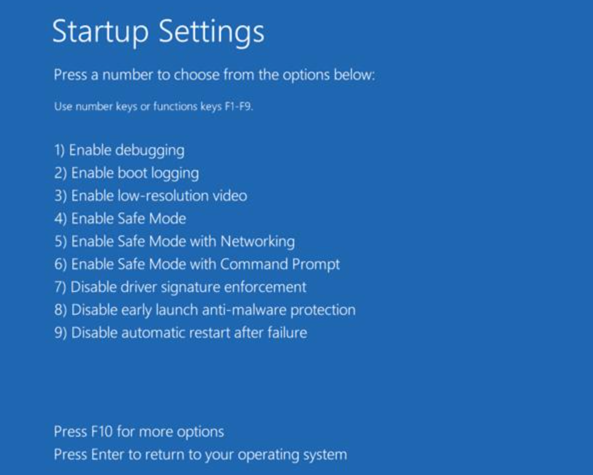
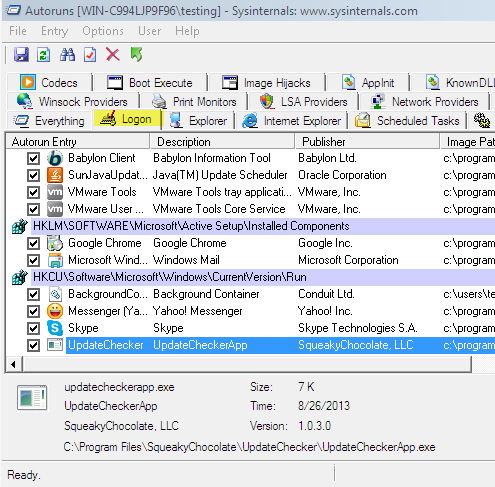
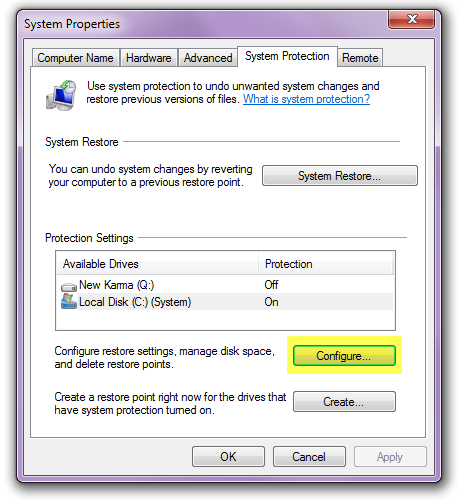
We have made a precise set of instructions that will help you remove the malware from the computer in case it has been infected with a fake antivirus.


Step 1: Restart the computer in Safe Mode with Networking

In this mode, Windows will only load the basic services and in most cases the malware won’t be active. Keep in mind that this is a diagnostic mode of the operating system, so most programs won’t operate, including your security solution.


How to restart the system in Safe Mode with Networking using Windows 7

    1. Restart the computer.
    2. Press the F8 key several times before Microsoft Windows begins to load; tap F8 in one-second intervals until a text menu will be displayed (the Advanced boot options).
    3. Select “Safe Mode with Networking” as shown in the image below.

Safe Mode with Networking - Windows 7


How to restart the system in Safe Mode with Networking using Windows 8, 10, 11

    1. Press the Windows key from your keyboard  + the C key.
    2. A new menu will be displayed in the right part of the screen; click Settings.
    3. Click Power, hold down Shift on your keyboard and click Restart.
    4. Click Troubleshoot.
    5. Click Advanced Options.
    6. Click Startup Settings.
    7. Click Restart.
    8. Press 5 on your keyboard to Enable Safe Mode with Networking. Windows will now start in Safe Mode with Networking.

Startup Settings

For more details on how to restart your computer in Safe Mode with Networking for Windows 10 and 11, please follow the link below:
https://support.microsoft.com/en-us/windows/start-your-pc-in-safe-mode-in-windows-92c27cff-db89-8644-1ce4-b3e5e56fe234

When presented with the login screen, choose the Administrator account. An info box will pop up, giving you the option to continue using Safe Mode or use system restore. Click YES to continue in Safe Mode with Networking.


2. Manually check for the infected file and remove it

After you are properly logged into your Windows user account, please download the following program: Autoruns for Windows – this tool will help you locate the malware on the computer.

Save the file and then extract the archived content (right-click on the Autoruns.zip folder and select ‘Extract here’, or simply double-click on the folder to open it).

In the folder you will find two .exe files: Autoruns and Autorunsc. Right-click on the file named Autoruns and select ‘Run as Administrator’.

The program will open and it will display a list of programs that are running on your system, as seen in the image below.

Autoruns can help you remove the fake antivirus

In Antoruns, locate and click on Logon, the second tab from the top of the window.

Scroll down the page and check in the Autoruns Entry for the file names. The malware will be displayed with a random name in most cases and won’t have any information displayed in the Description or Publisher sections. Verify the Image Path section for the files located in the following locations:

    • C:\Users\
    • C:\Users|”Random Folder”
    • C:\Users\”Computer User” \AppData\Local\
    • C:\Users\”Computer User” \AppData\Local\Temp
    • C:\Users\”Computer User” \AppData\Local\”Random Folder”
    • C:\Users\”Computer User” \AppData\Roaming\
    • C:\Users\”Computer User” \AppData\Roaming\”Random Folder”
    • C:\ProgramData\
    • C:\ProgramData\”Random Folder”

In most cases, the malware will be located under the registry key displayed in Autoruns as: HKCU\Software\Microsoft\Windows\CurrentVersion\Run

Under Image Path also check the extension of the file, which will be one of the following: .exe, .dll, .com, .bat, .dat, .lnk, .js.

Once you have located the suspect file, right-click on it and select Jump to Folder. A window showing the location of the malware on your computer will automatically open.

To remove the file, you must first right-click on the file and select Delete. Then return to the Autoruns window, right click on the suspect file and select Jump to Entry. This will open the registry editor window and it will display the registry key that loads the malware.

The registry key will be selected by default when you choose to open the specific entry. At this point, the only thing that remains to be done is delete the registry key simply by right-clicking on it and selecting Delete.

You can now close the registry editor, as well as Autoruns, and empty your Recycle Bin.


3. Delete all restore points

It is highly probable that at least one restore point might have been created during the time your computer was infected, which means that restoring your computer to a previous state would bring back the malware.

In order to properly remove all traces of infection, you will also need to clear all of your restore points.

To do this, follow the next steps:

    1. Open Control Panel, select System and Security, then click on System.
    2. On the left side of the System window, click and select System protection.
    3. If Administrator permission is required, click Yes.
    4. The System protection window will now be opened and you need to have the System Protection tab at the top of the window selected.
    5. Click on the Configure button in the window.
    6. This will open a new window, with Restore Settings at the top – at the bottom of the window, look for “Delete all restore points” and click on the Delete button next to it.
    7. Click Continue to confirm removal, then click on the Close button when prompted.
    8. Click OK to close the other windows.

Delete restore points to eliminate the risk of returning the fake antivirus.

At this point all the restore points have been removed, which means you have eliminated the risk of returning the computer to an earlier stage when the infection was present.


4. Restart your computer in Normal Mode

Log in to your user account and observe the behavior of the system. At this stage the Fake Antivirus infection should have been completely removed.